For more details on other features, please refer to the Q&A section.
Note: Due to personal information protection policies at Kyushu University, some features are restricted:
・User search is limited, except between faculty and staff directly employed by the university.
・Creating and searching for teams is restricted.
*For details, please refer to the Q&A section.
How to Install
Check if Teams Is Already Installed
Verify whether the desktop app version of “Microsoft Teams” is already installed.
If it is installed, proceed to “3. Sign In.”
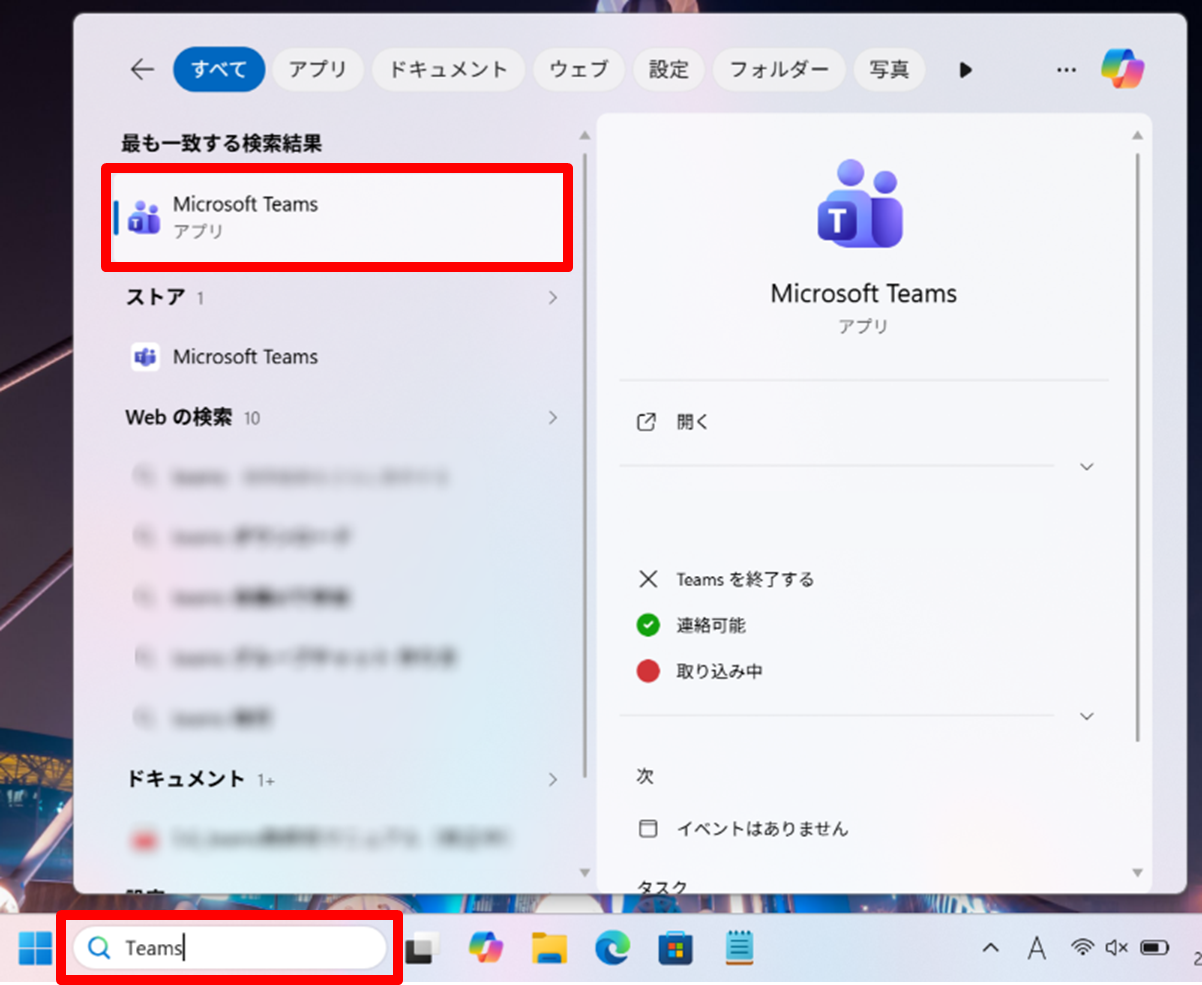
(a) For Windows
Enter “Teams” in the search box at the bottom-left of the desktop and check whether “Microsoft Teams” is installed.
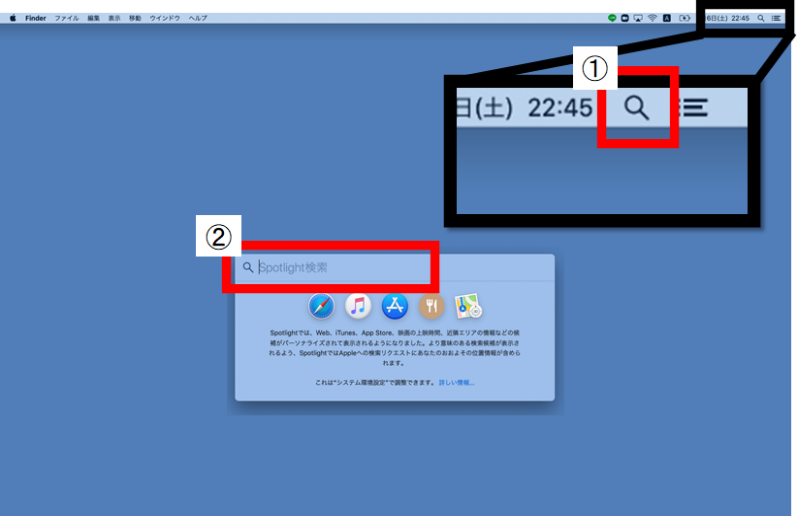
(b) For Mac
Use Spotlight or another search method to check whether the app is installed.
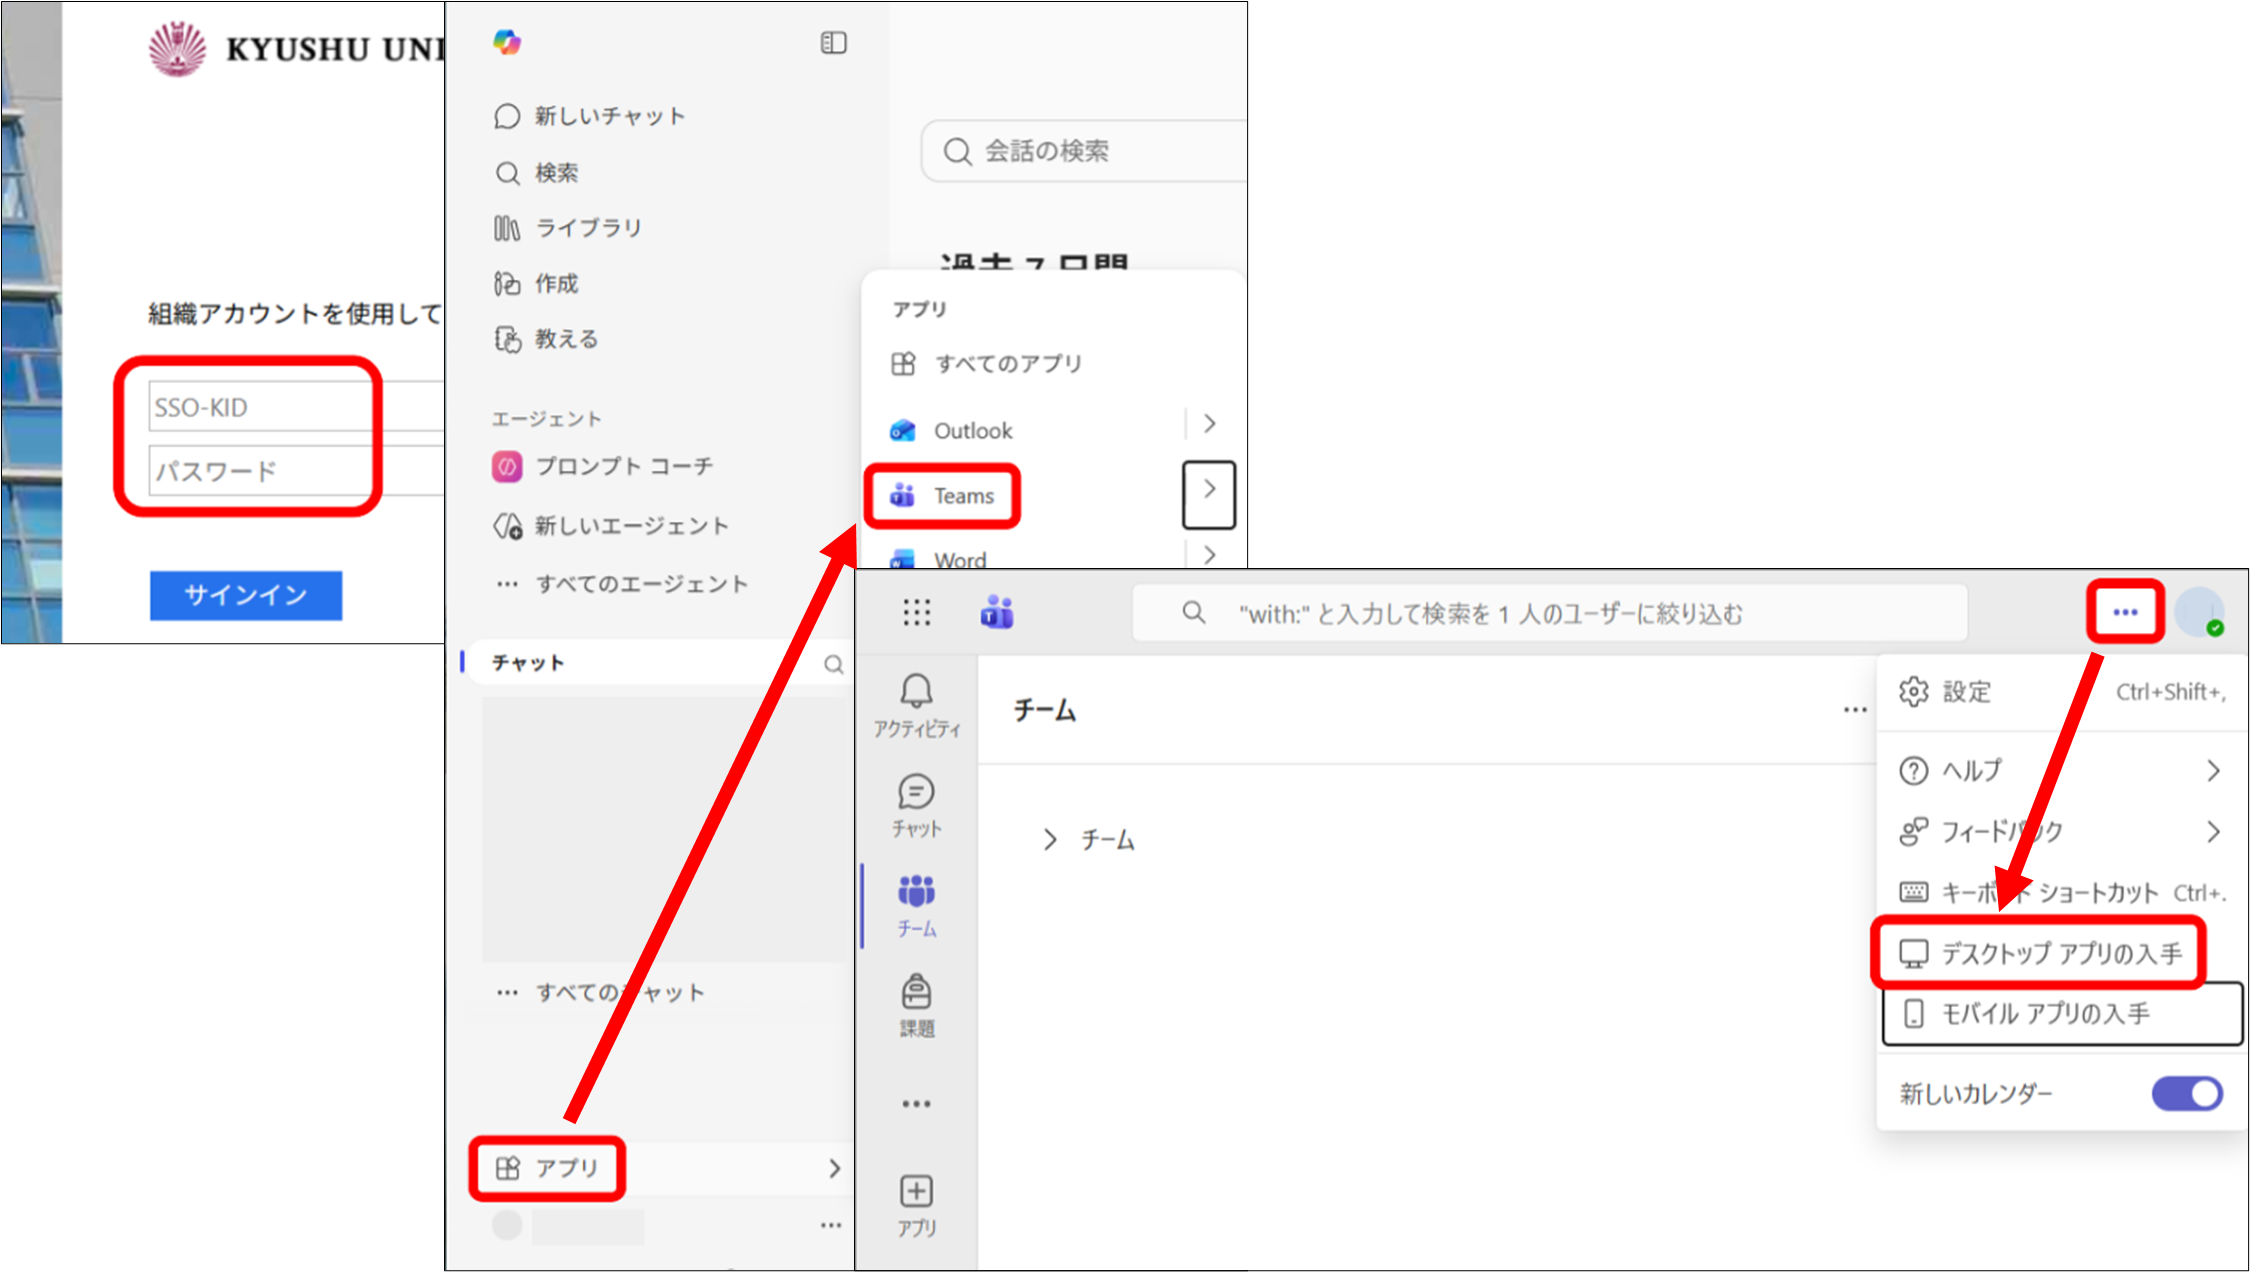
Download the Installer
① Access Kyushu University’s Microsoft 365 and sign in with your SSO-KID https://ci.iii.kyushu-u.ac.jp/365/login
② On the Microsoft 365 (Office 365) home screen, click “Apps” at the lower left, then click “Teams”
③ The browser version of “Teams” will open. Click the “…” at the top right, then click “Download the desktop app”
The download will start automatically.
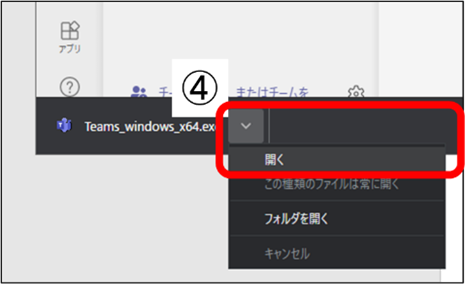
④ Run the Teams installer from your “Downloads” folder or from the download history shown at the bottom-left of your browser.
If prompted for permission to allow changes to your device, click “Allow”.
Sign In
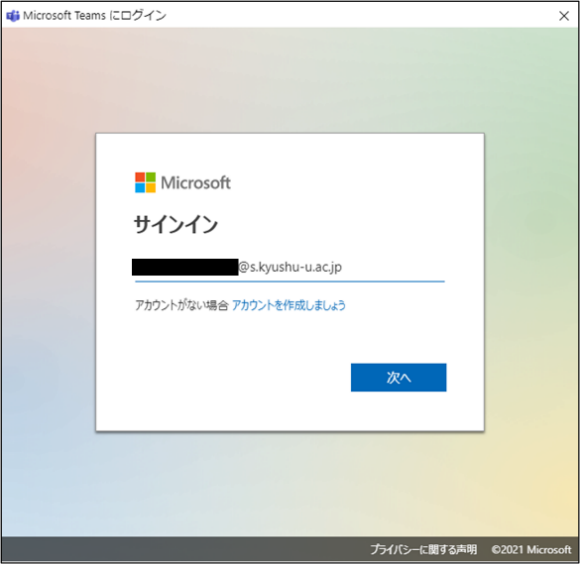
① Launch Teams, enter your Kyushu University primary email address, and click “Next”
※ Kyushu University primary email address format: [Family name].[First name].[3-digit number]@m.kyushu-u.ac.jp
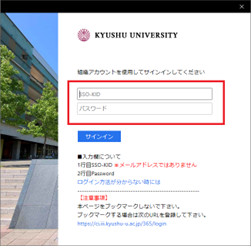
② When redirected to Kyushu University’s authentication page, enter your SSO-KID and password, then click “Sign in”
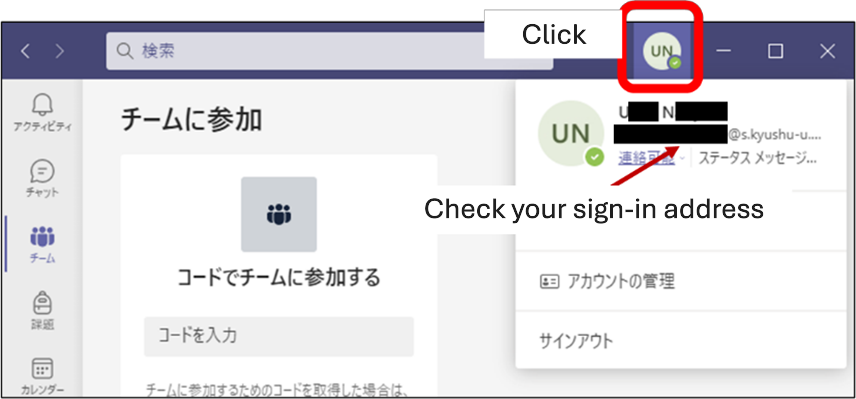
Once you have successfully signed in, Teams will open automatically. When you click the icon at the top right, your sign-in address will be displayed.
If you are signed in with your Kyushu University primary email address, the setup is complete.
How to Hold an online meeting
Create a Meeting
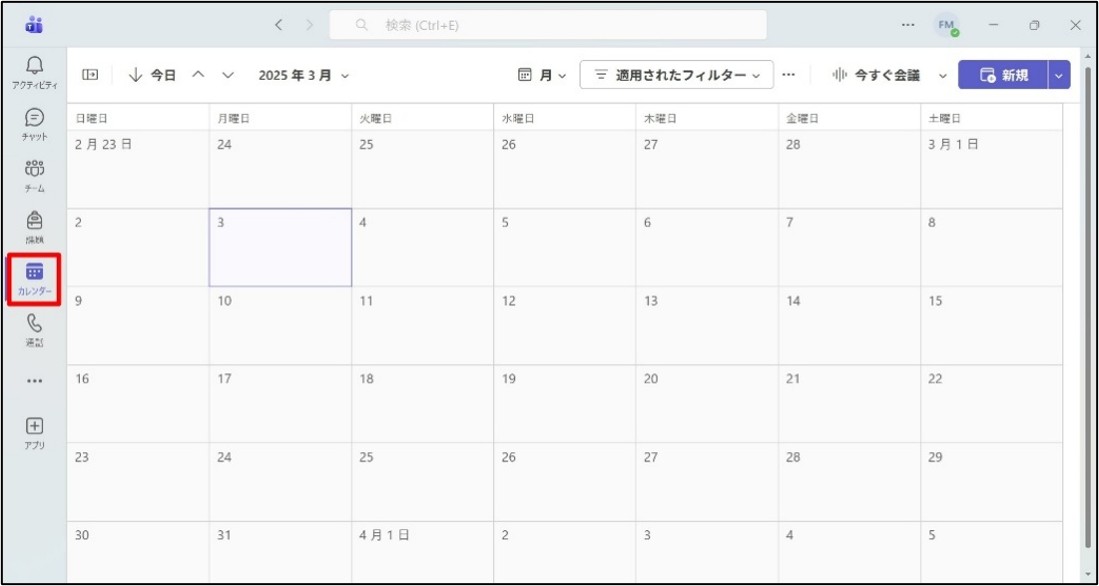
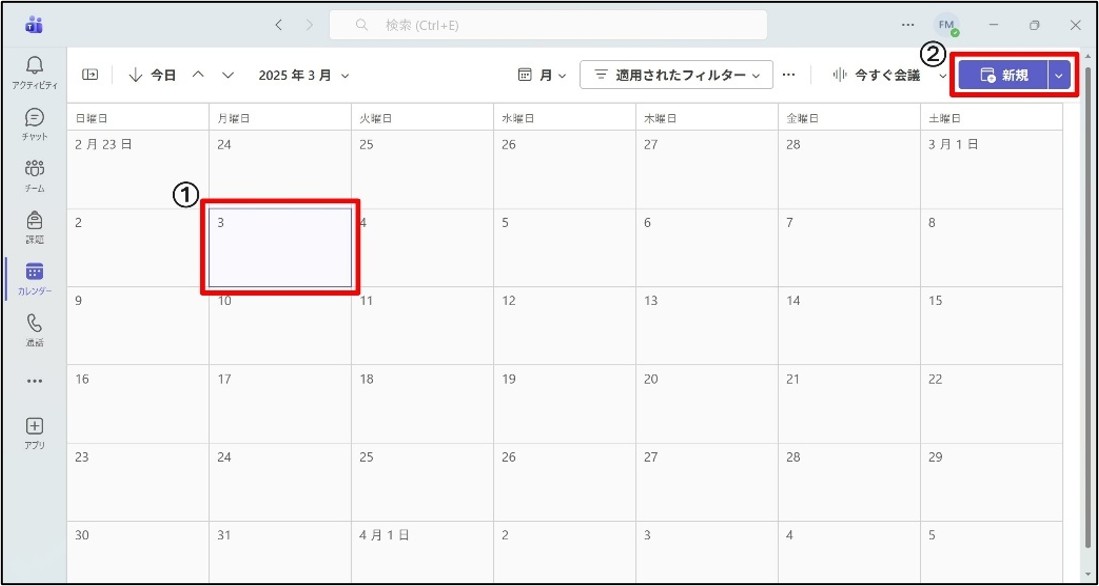
Click “Calendar” on the left toolbar in Teams
Select the meeting date and add an event
① Click the meeting date in the calendar
② Click “New” in the upper right
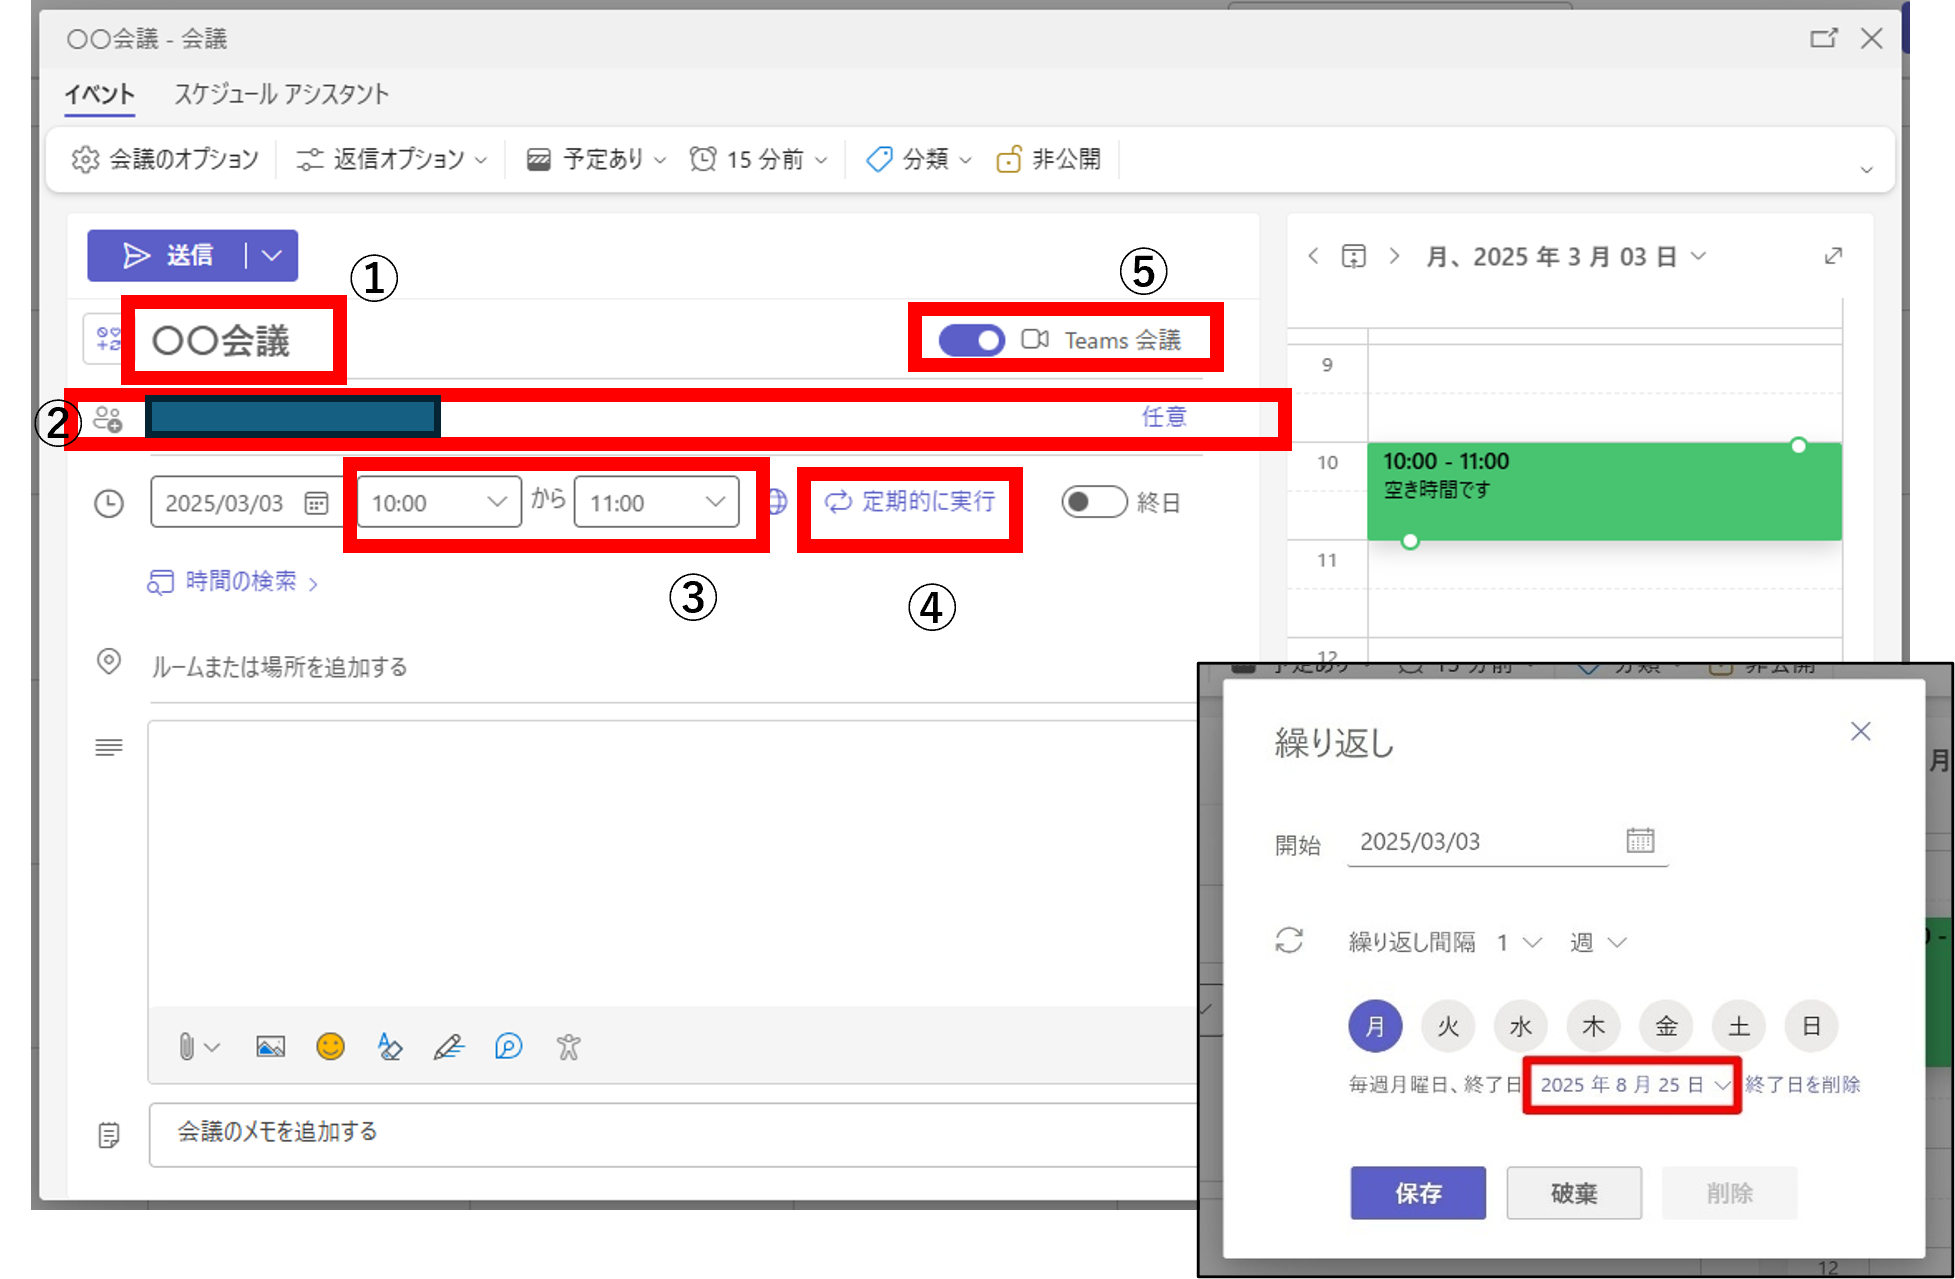
Set up the meeting as an event
① Title: Enter the meeting name
② Invite attendees: Invite required attendees (Click “Optional” to add optional attendees)
*It is not required, but if you add attendees, Teams will automatically send them a meeting request and add the event to their Outlook calendars.
③ Time: Set the meeting start and end times
④ Repeat: Configure as needed
*Not required if the meeting is held only once (default is “Does not repeat”). Clicking this opens settings for recurrence interval and end date.
⑤ Teams meeting: Set to “On”
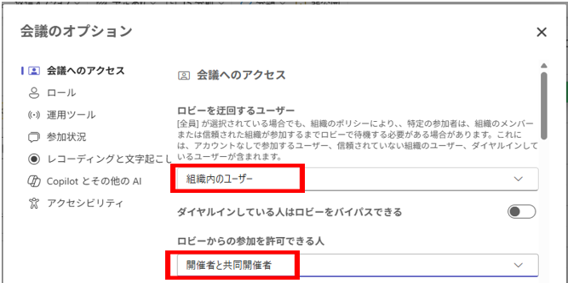
Change participant permissions
By default, anyone who has the meeting URL can join the meeting directly. To prevent participation by unknown users, change the settings so that Kyushu University members can join after authentication, and external users can join only after being admitted from the lobby. Also, by default, organizers, co-organizers, and presenters have permission to admit participants from the lobby. To avoid accidental admission, change this to “Organizer and co-organizers only”.
Roles in Teams meetings are as follows. Higher roles have more permissions and control.
Organizer (the user who started the meeting): Full control of the meeting
Co-organizer: Same permissions as the organizer
Presenter: Has permissions second only to the organizer, such as sharing screens and admitting participants.
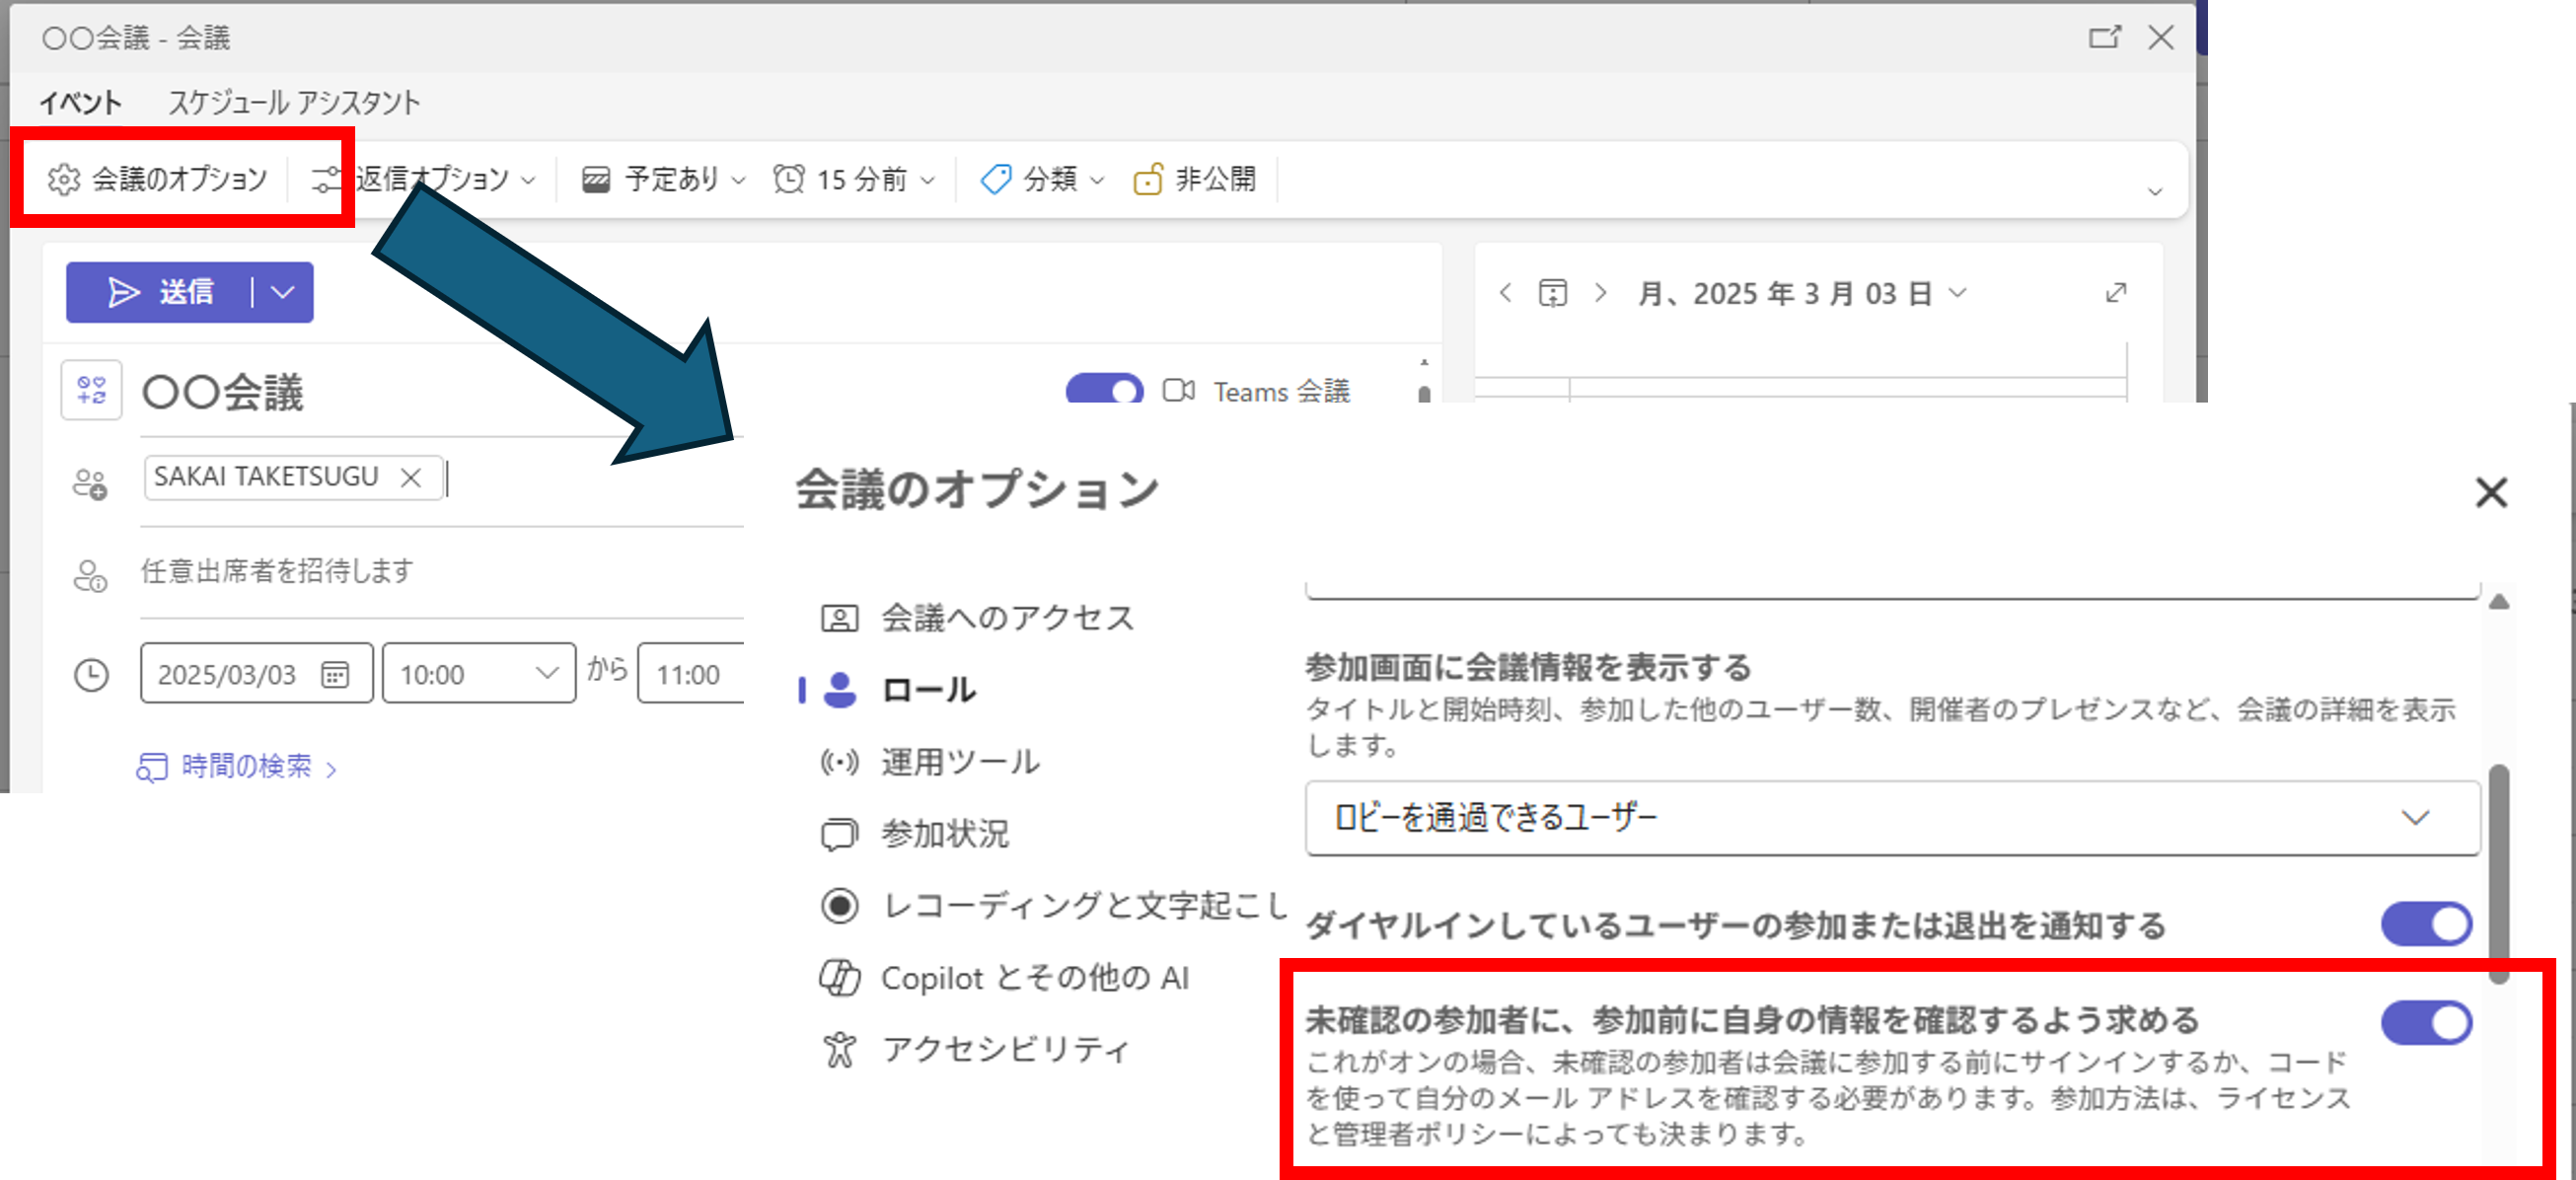
① Click “Meeting options” in the upper left
② Change the settings as follows Who can bypass the lobby: Users in your organization (users signed in with a Kyushu University email address) Who can admit from the lobby: Organizer and co-organizers
③ About distributing the meeting URL
When sharing the meeting link with participants, please turn “ON” the setting “Require unverified participants to verify their info before joining” to prevent identity spoofing or unauthorized access. This ensures that Microsoft account authentication is required even when joining from a web browser. When joining via a web browser, Kyushu University members will be required to sign in using their SSO-KID, while all other participants will need to complete authentication and then wait in the lobby.
After completing the above settings, click “Apply”.
Share Meeting Links
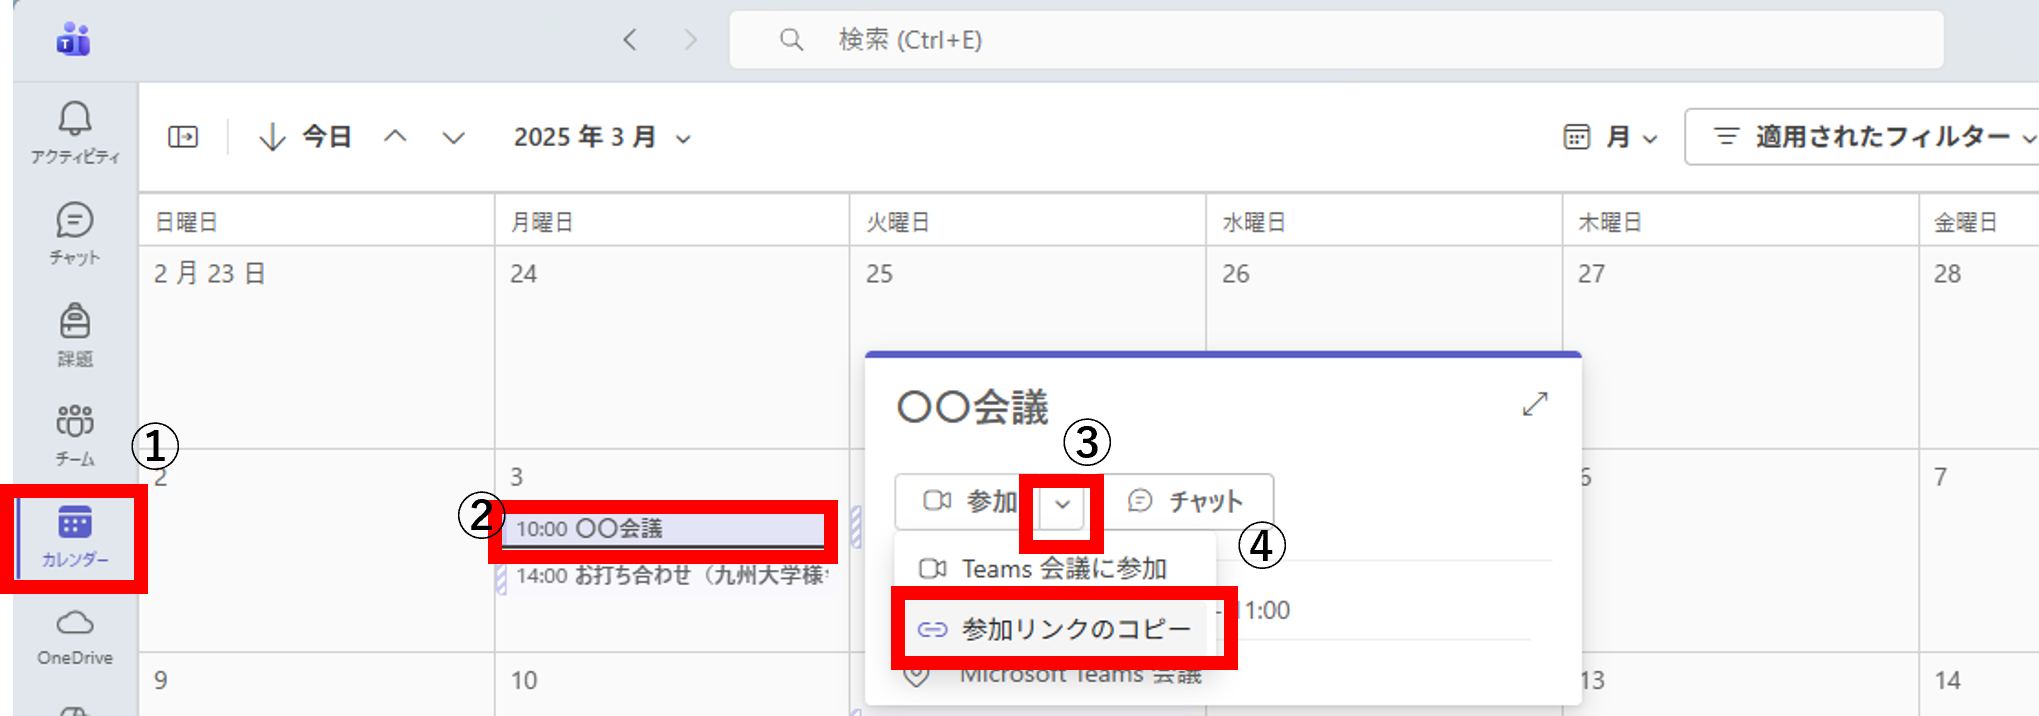
① Click “Calendar” on the left toolbar in Teams
② Click the meeting for which you want to obtain the link
③ When the popup window opens, click the ▼ next to the “Join” button
④ Click “Copy join link”
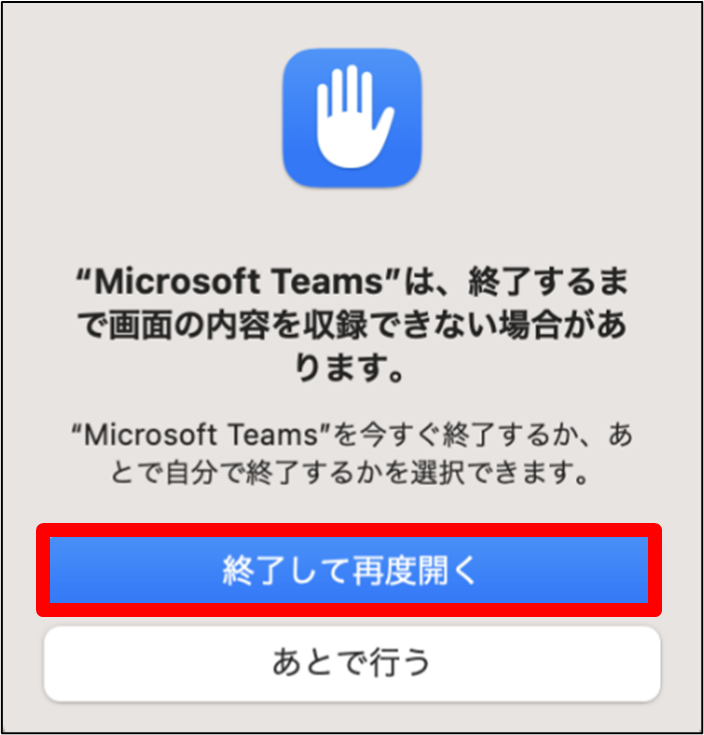
First-Time Screen Sharing on Mac
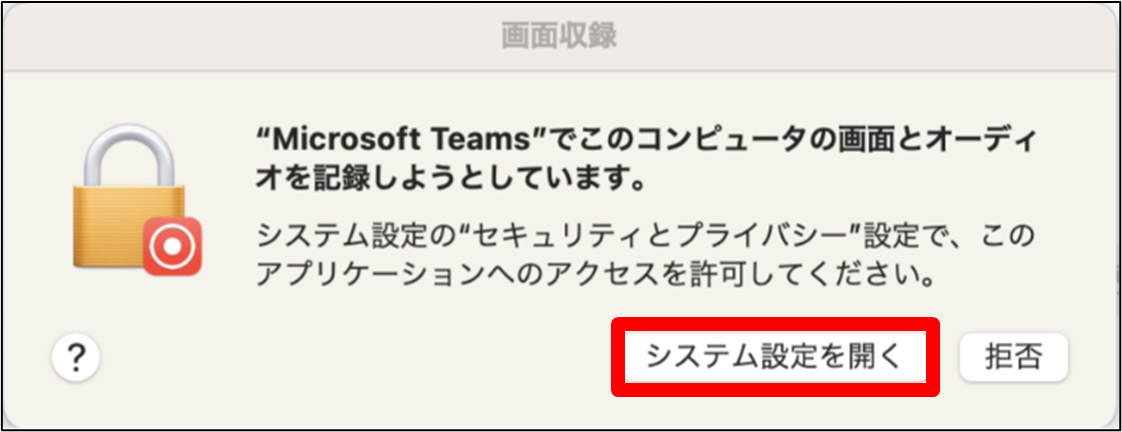
When sharing your screen on a Mac, you must grant “Screen Recording” permission to the Teams app.
Since this setting requires restarting the Teams app, please follow the steps below before your actual meeting to allow screen recording and verify that screen sharing works properly.
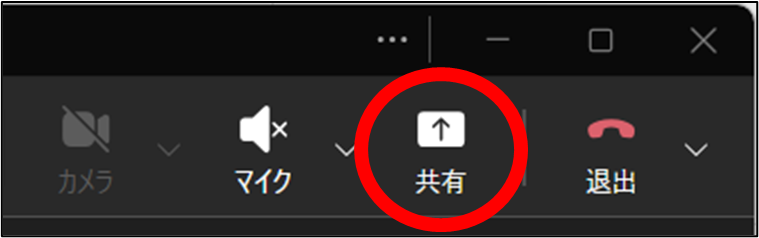
In the Teams meeting window, click “Share” (screen sharing).
When the following dialog appears, click “Open System Settings”.
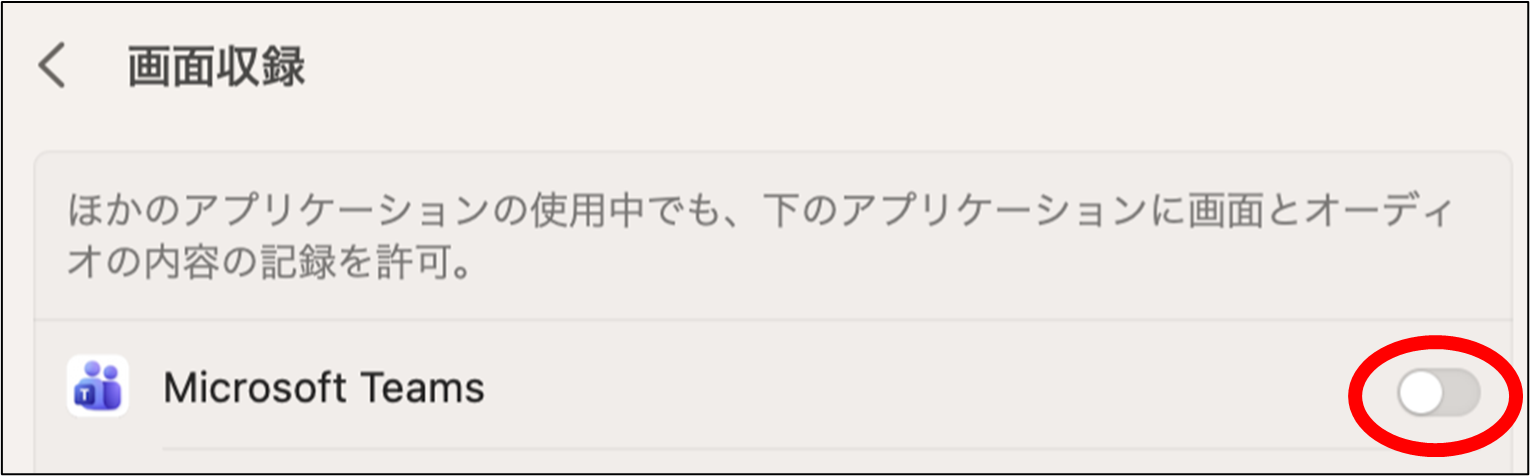
When the Screen Recording settings window opens, turn on “Microsoft Teams”.
When the following dialog appears, click “Quit & Reopen”.
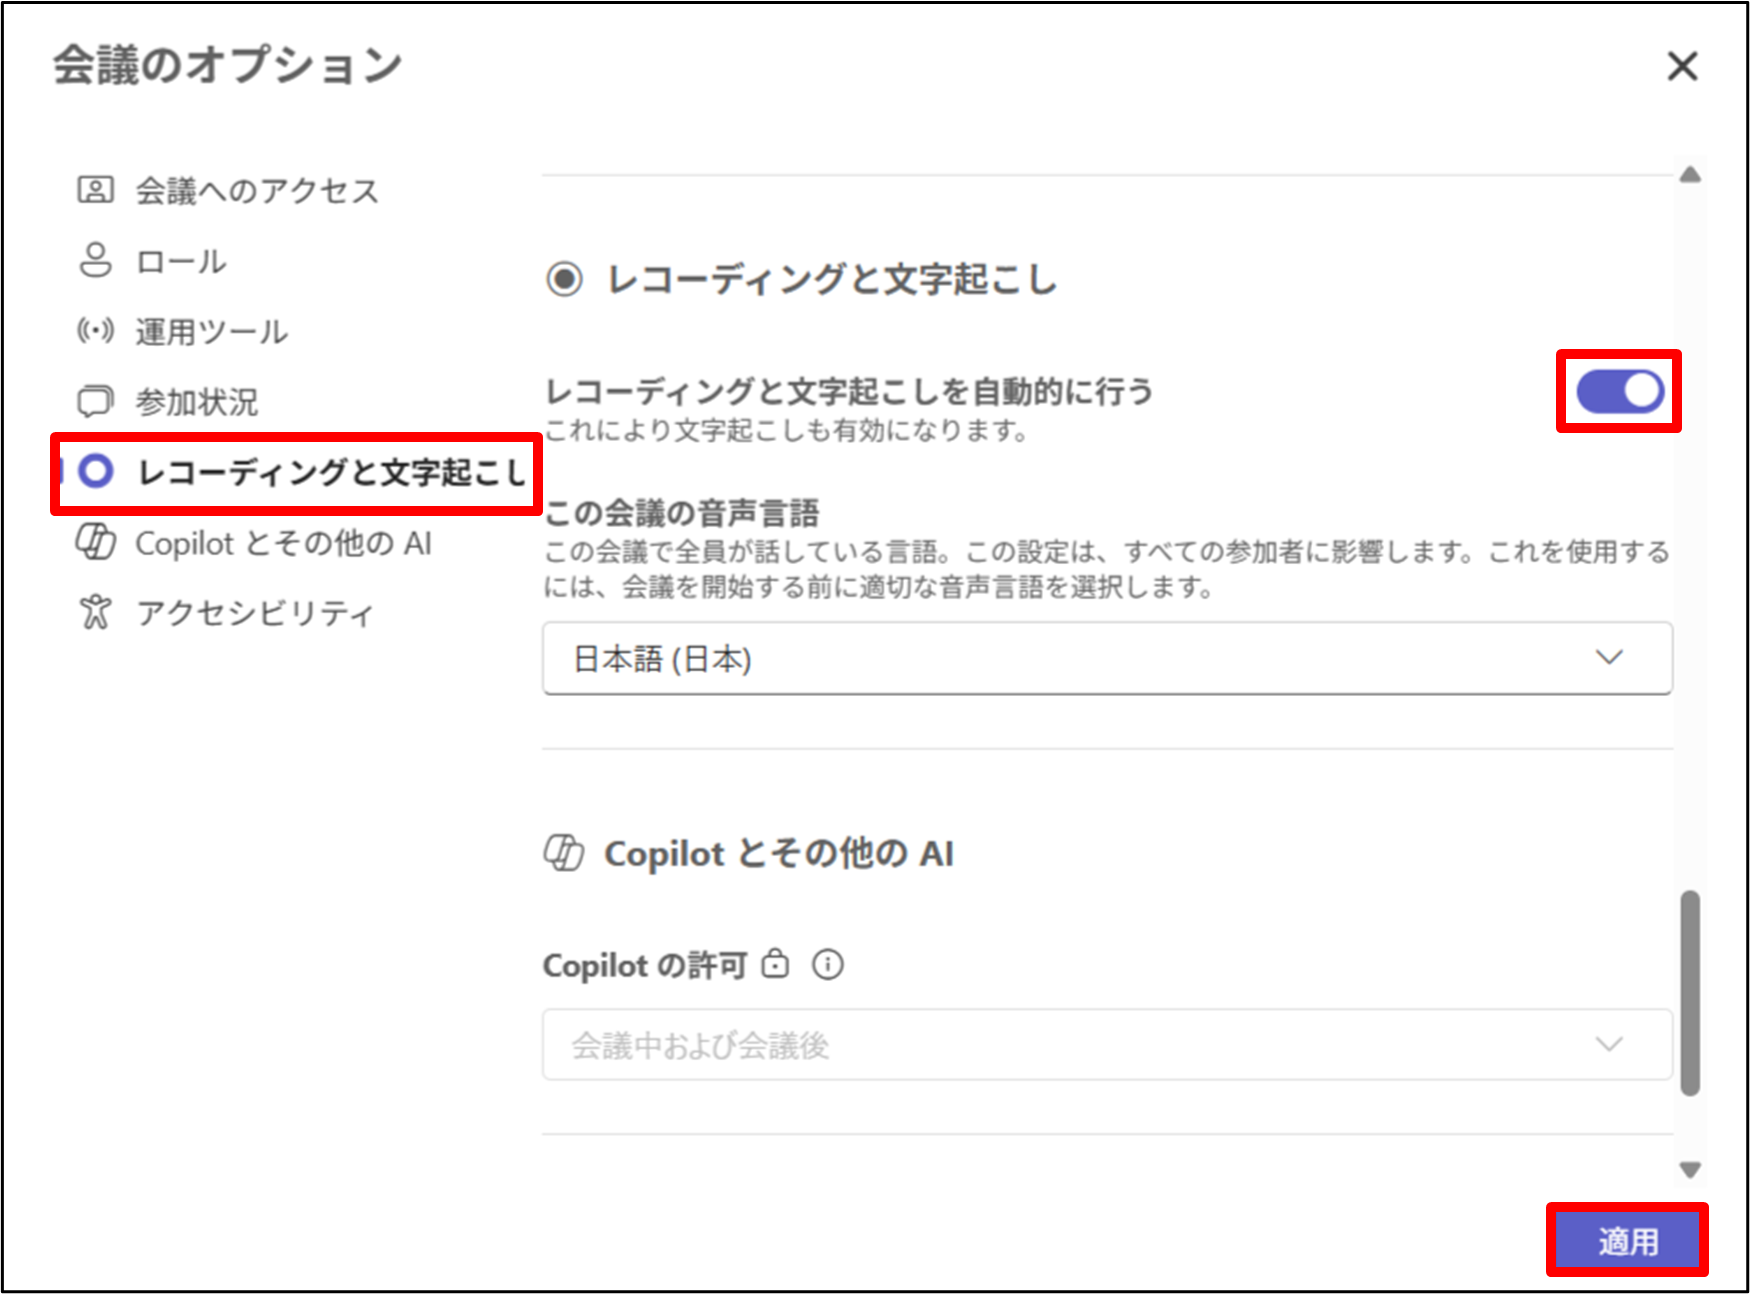
Recording and Transcription Settings
You can start recording and transcription manually during the meeting, but if you enable “Record and transcribe automatically” in “Meeting options”, recording will begin automatically when the meeting starts. You can change this setting later as well.
Join a Meeting
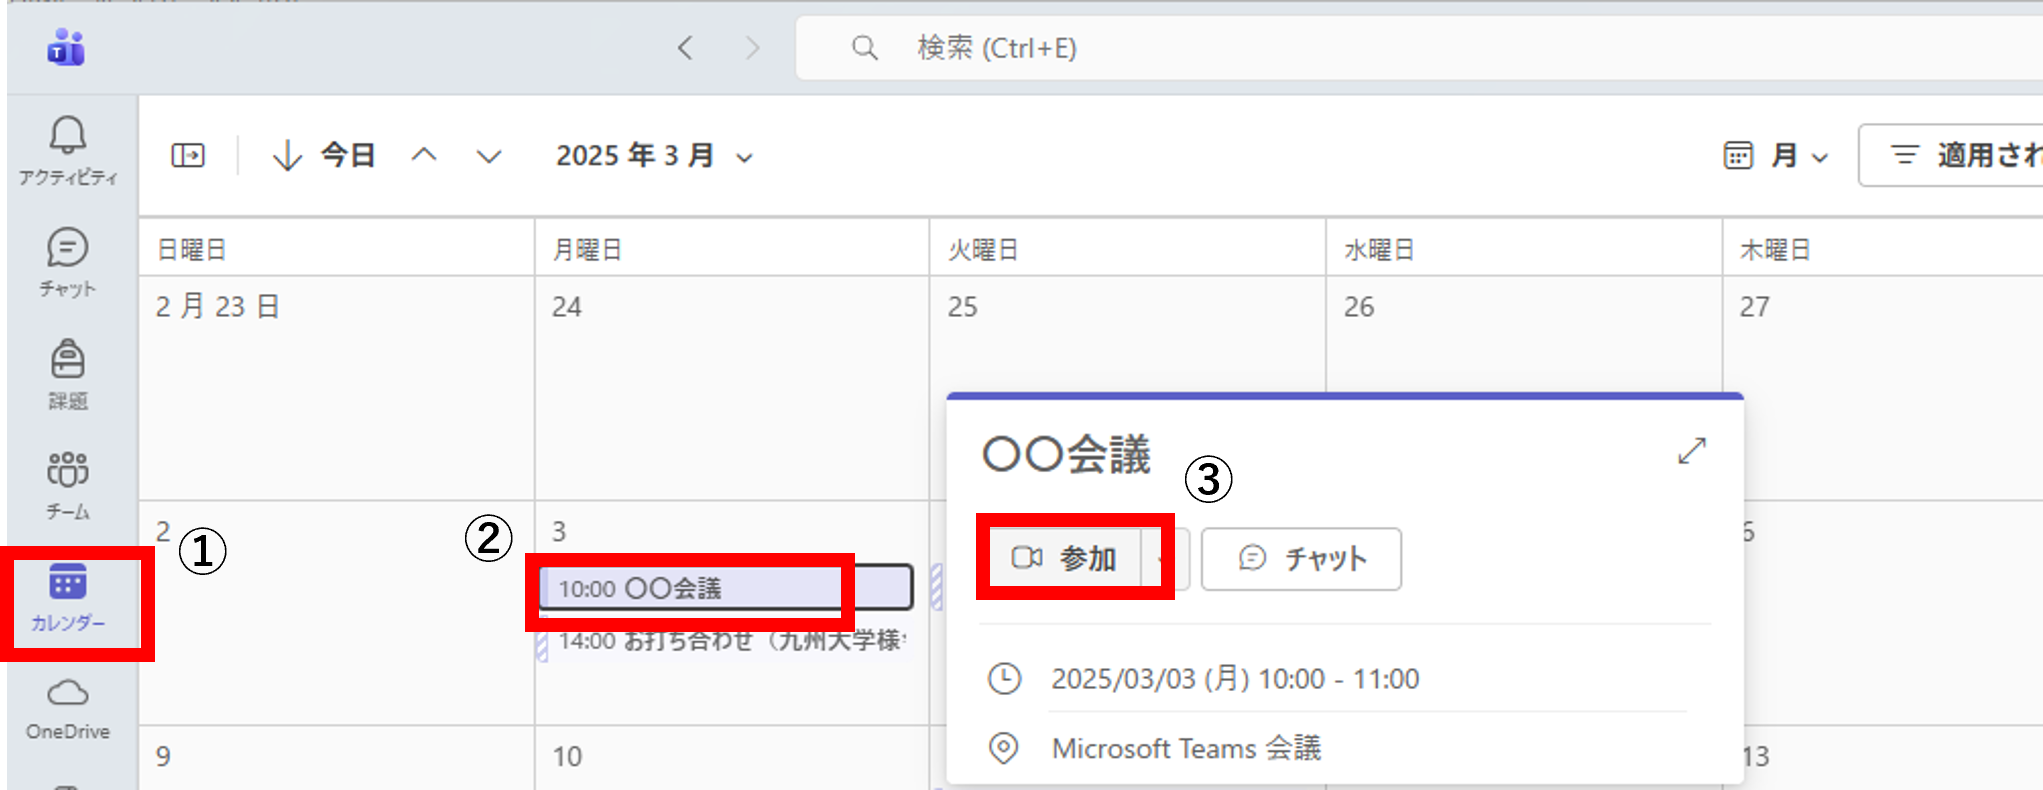
A. Join via Teams Calendar
① Launch Teams and click “Calendar” from the toolbar.
② Click the meeting you want to open.
③ Click “Join”.
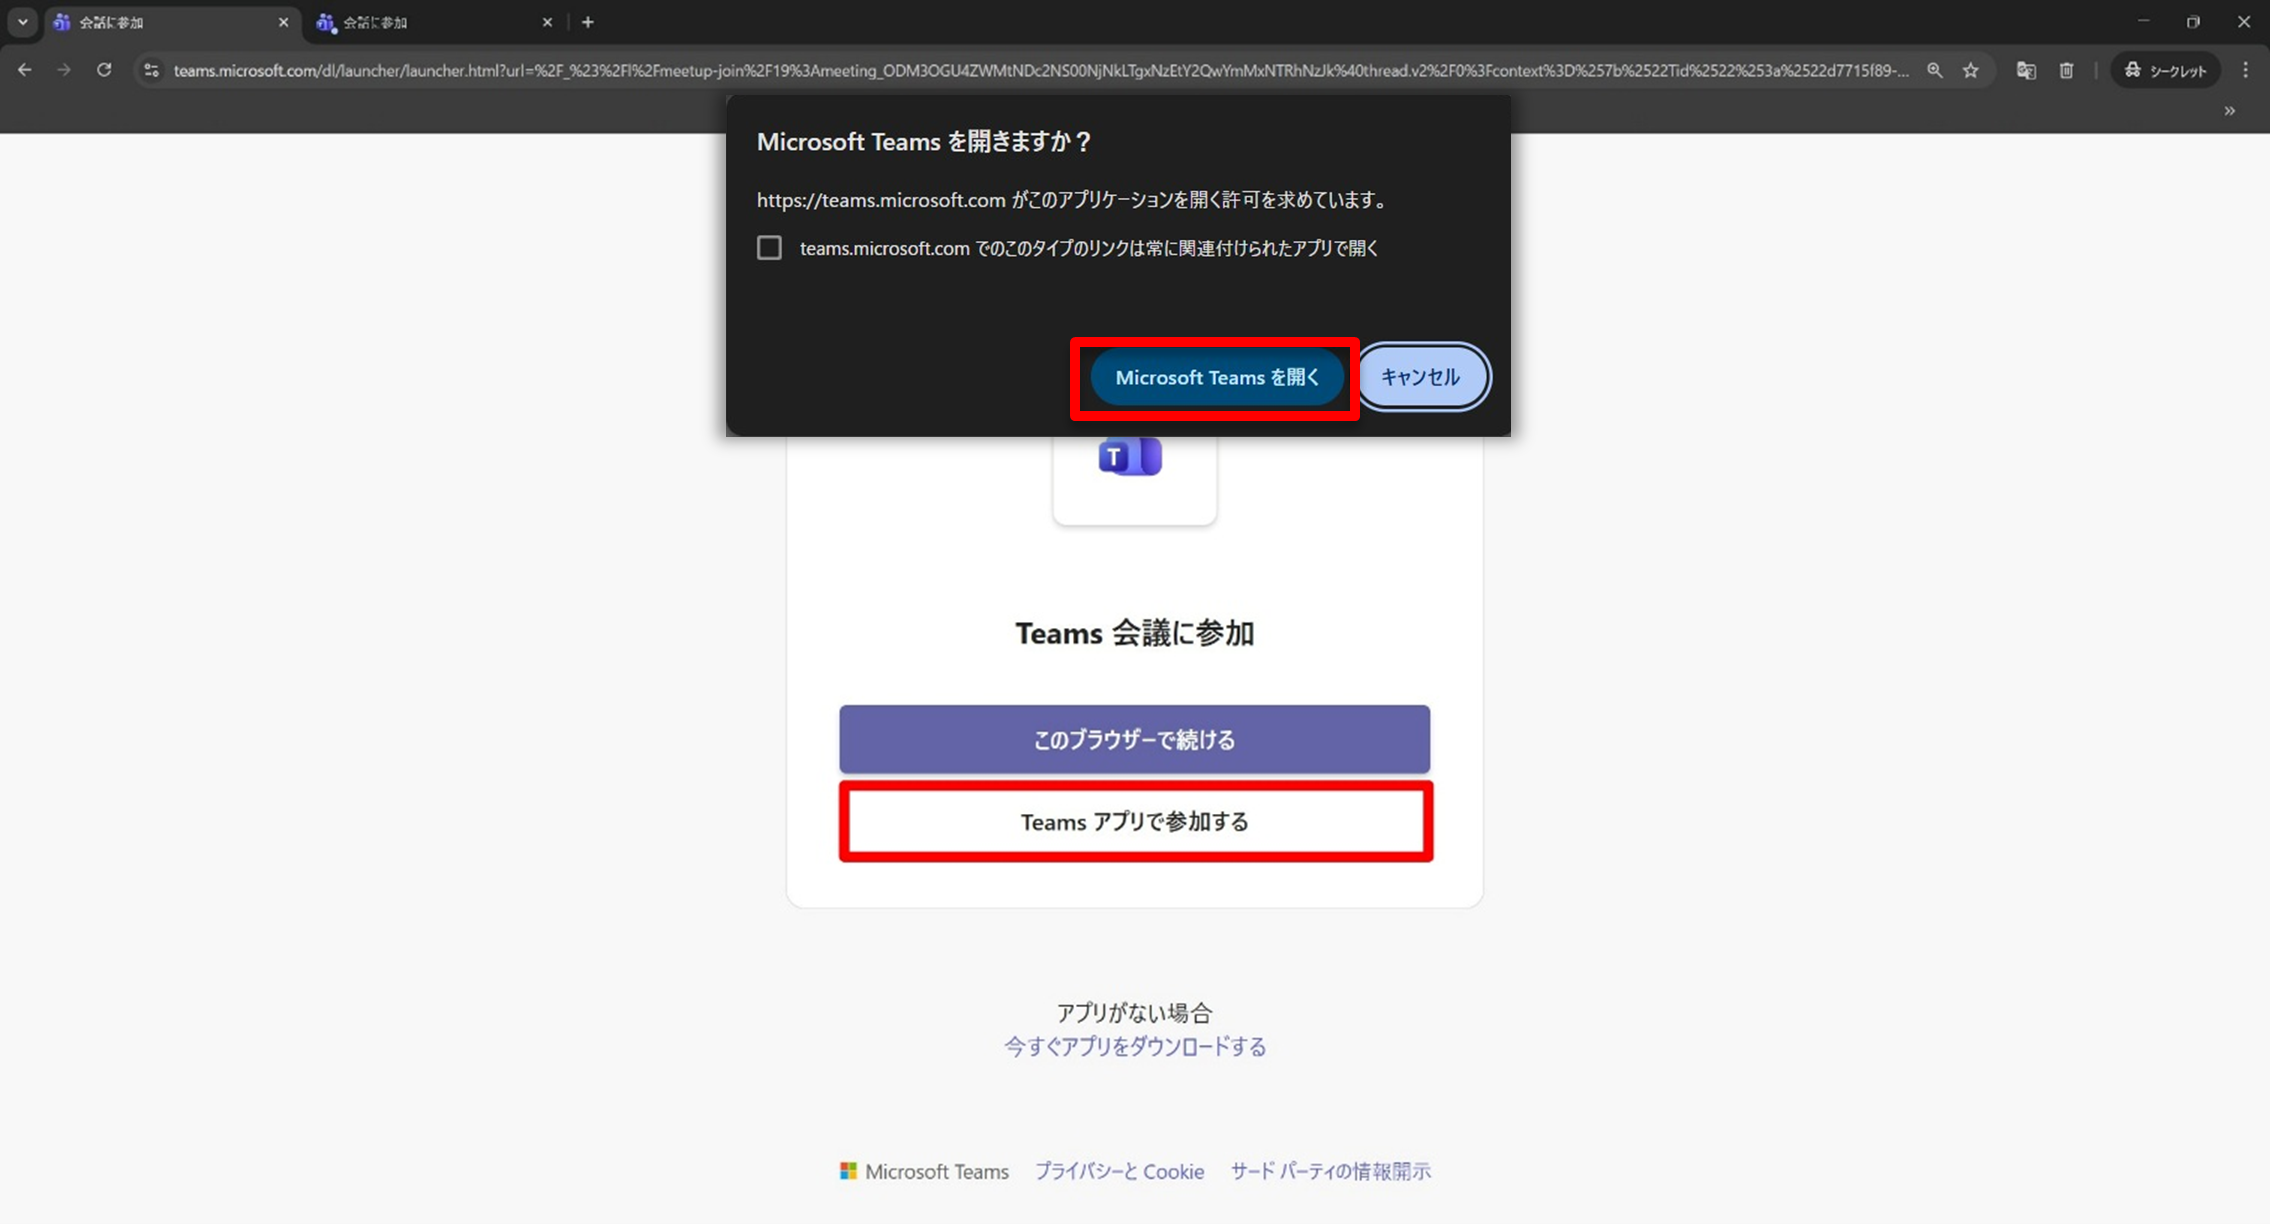
B. Join via Meeting Link
Click the provided Teams meeting URL, or copy and paste the URL into your browser’s address bar and run it.
When a prompt appears asking how you would like to join the meeting, select “Open Microsoft Teams” or “Join with Teams app."
*If the desktop version of Teams is not installed, the popup may not appear.
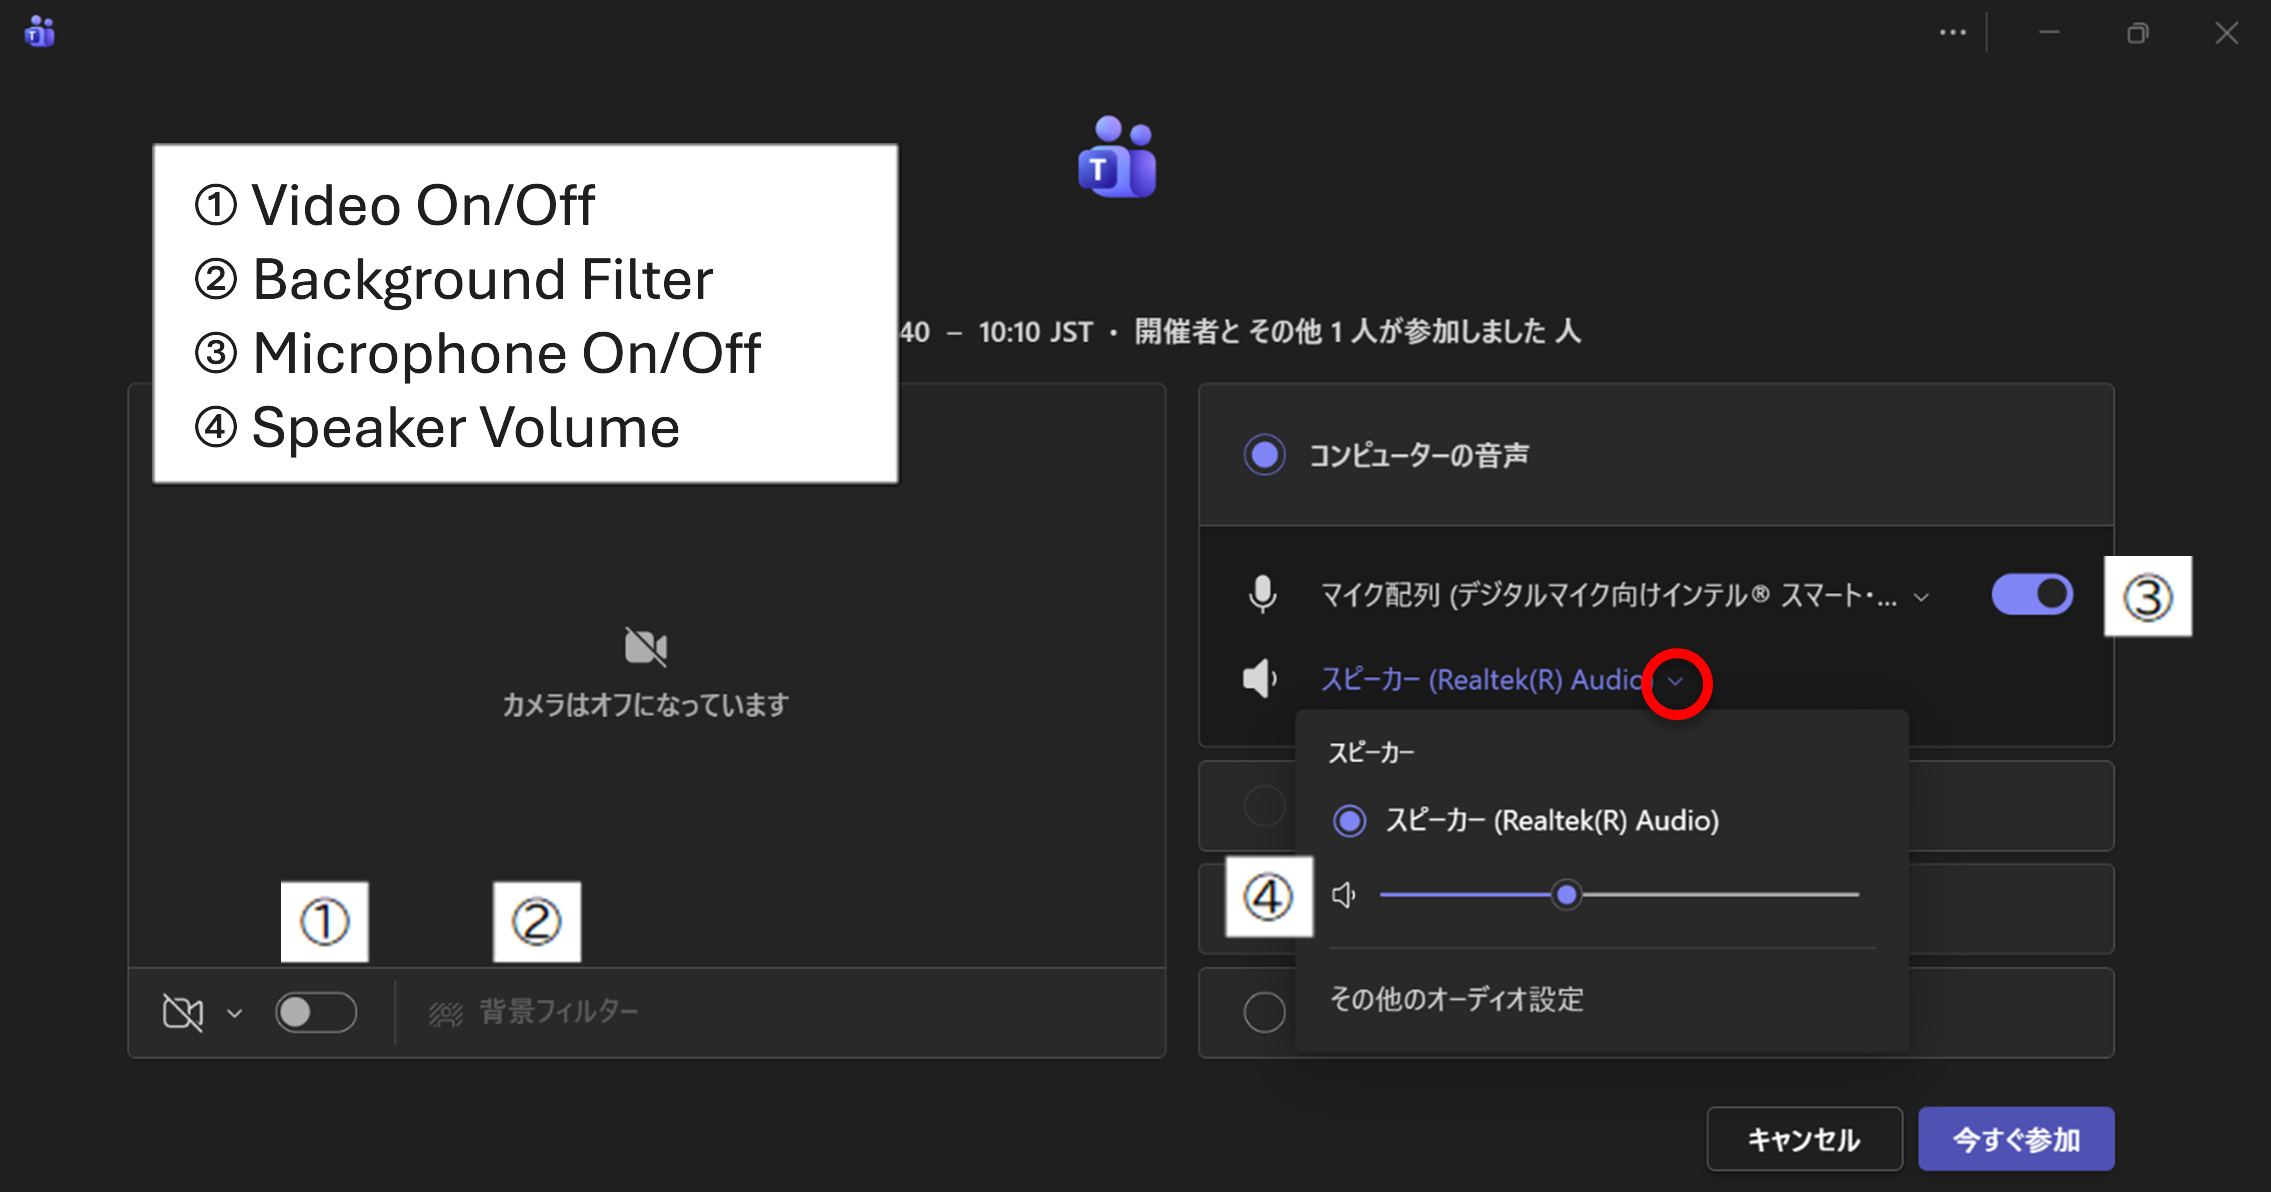
Set Up Video and Microphone Before Joining
If your video or microphone is not recognized by Teams, check your settings under “Device settings”. Once the settings are confirmed, click “Join now”.
*To avoid sending audio unintentionally, we recommend joining the meeting with your microphone turned off (muted).
*If someone is already in the meeting you’re joining, your microphone will be turned off automatically.
For users who join a meeting while signed in to Kyushu University’s Microsoft 365, their name and Kyushu University primary email address will be displayed.
If you join using another account (such as a personal Gmail account), you will join as a guest, and some features may be limited, such as not being able to post in the chat.
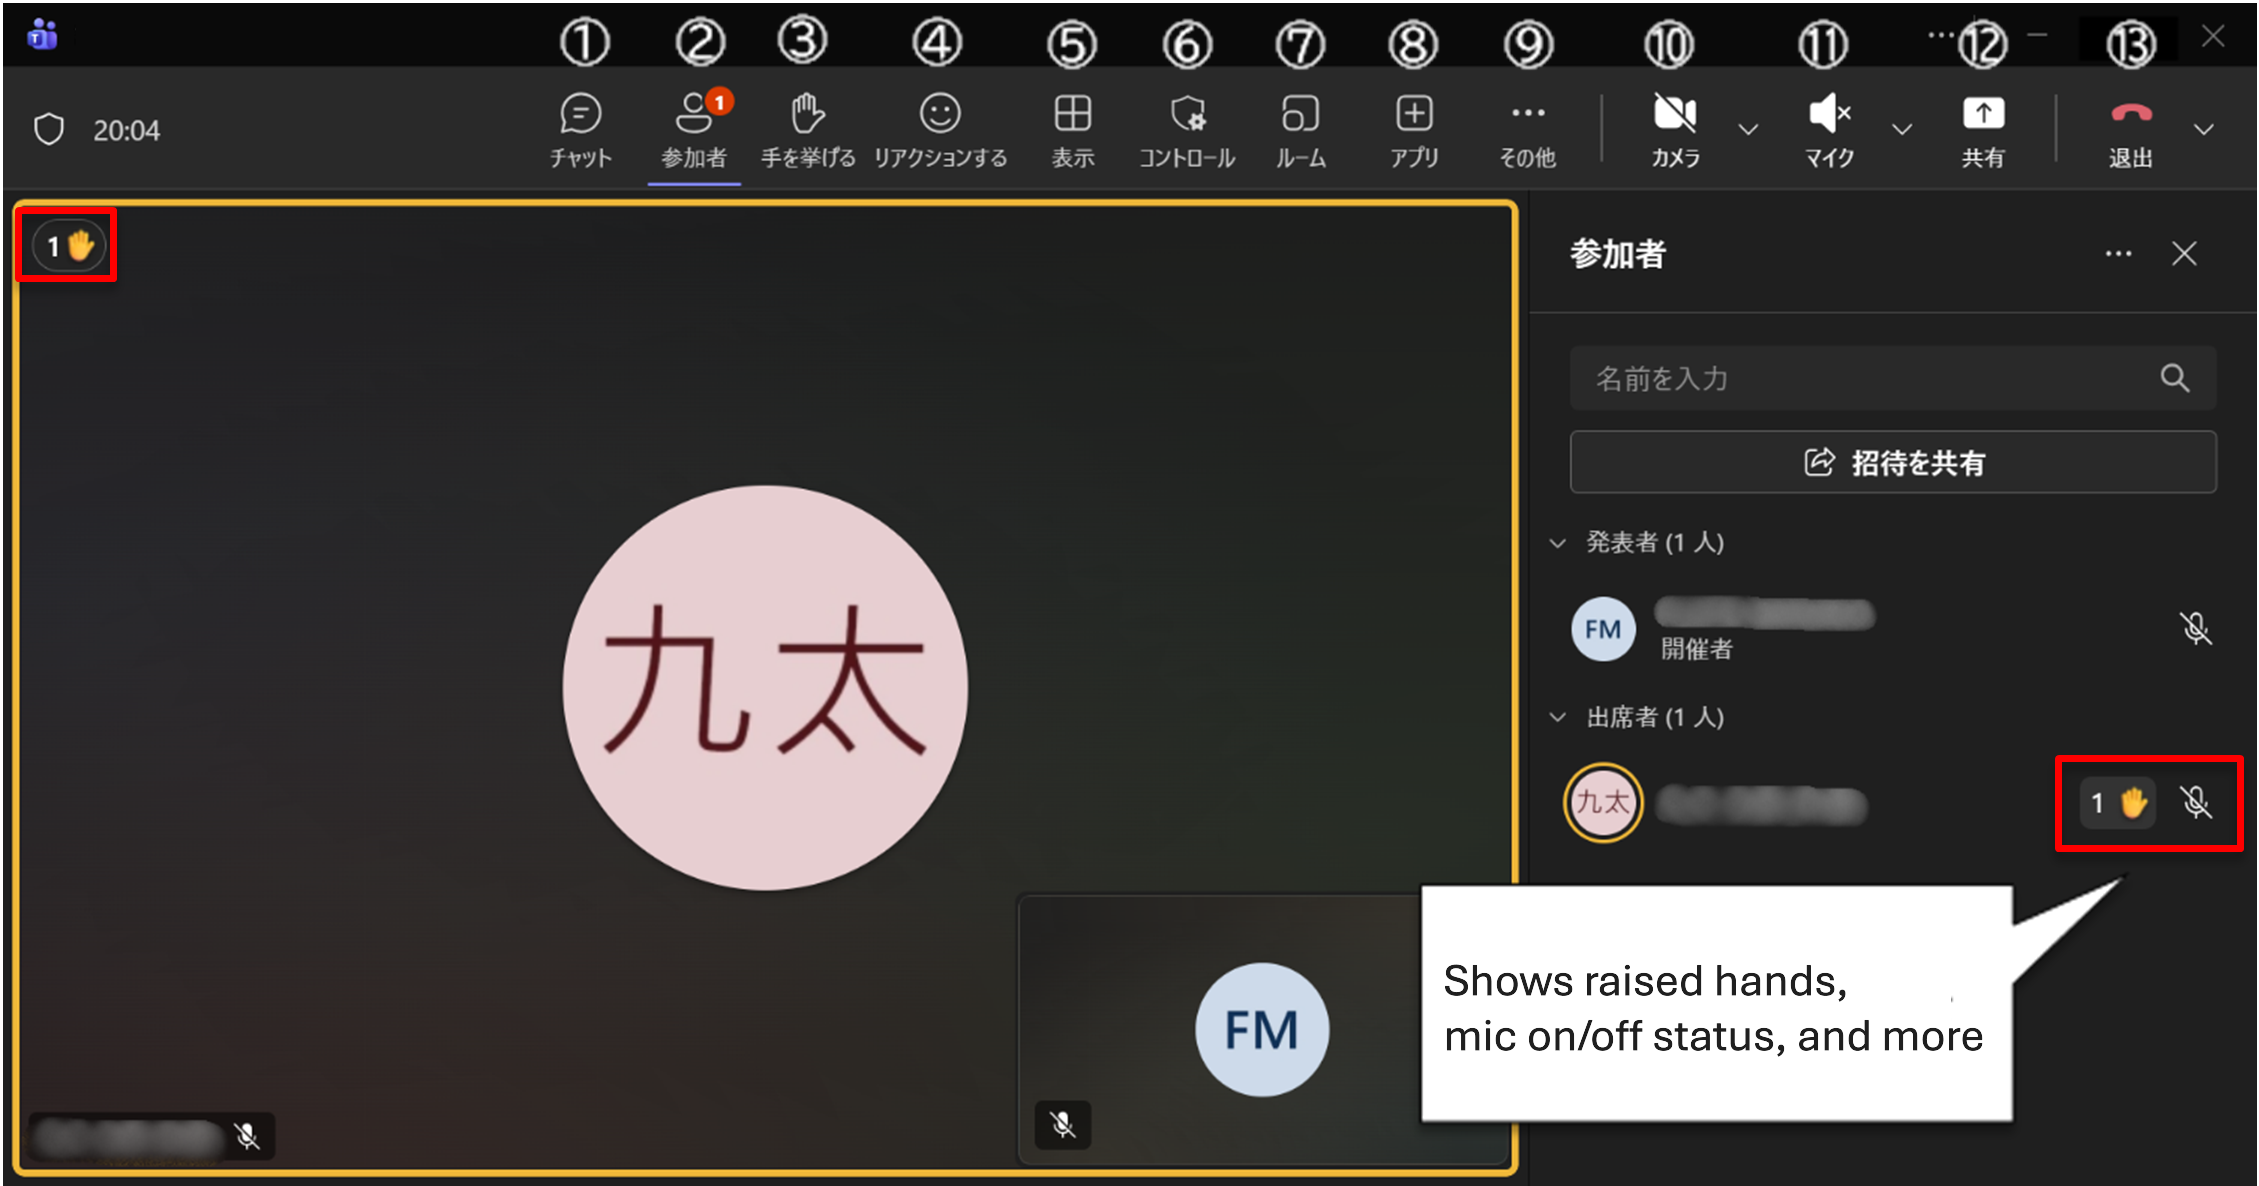
The functions of each button are as follows:
① Show conversation
② Show participants
The number of raised hands is shown as a badge.
③ Raise hand
④ Send a reactions
You can select and share reactions such as “Like”.
⑤ Change view
⑥ Controls (Organizer only)
・Lock meeting
・Enable/disable the lobby
・Manage participant permissions
・Meeting options
⑦ Breakout rooms (Organizer only)
⑧ Get more apps and agents (Organizer only)
⑨ More actions *Some settings are available only to the organizer
・Recording and transcription
・Meeting info
・Timer
・Video effects and settings
・Audio settings
・Language and speech
・Other settings
⑩ Turn camera on/off
⑪ Turn microphone on/off
⑫ Share content
Allows you to share your screen.
* See “Screen Sharing Settings”
⑬ Leave
・Leave (yourself only)
・End meeting (disconnect everyone) *Organizer only
This feature prevents new participants from joining the meeting. For details, please refer to the Microsoft support page below and enable the setting as needed. Lock a meeting in Microsoft Teams
Prevent Meeting Forwarding
This setting prevents participants from forwarding the meeting invitation email to third parties.
For details, please refer to the Microsoft support page below and configure the setting as needed.
*This feature is available when you are signed in to Teams using a Kyushu University account.
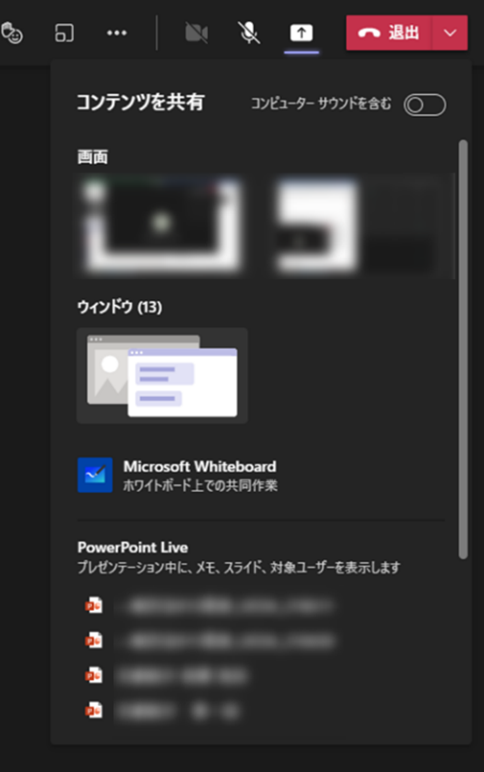
In the meeting window, click the icon labeled ⑫ in the toolbar to open the content sharing (screen sharing) settings.
“Include sound”
Turn this on if you want to share audio from videos.
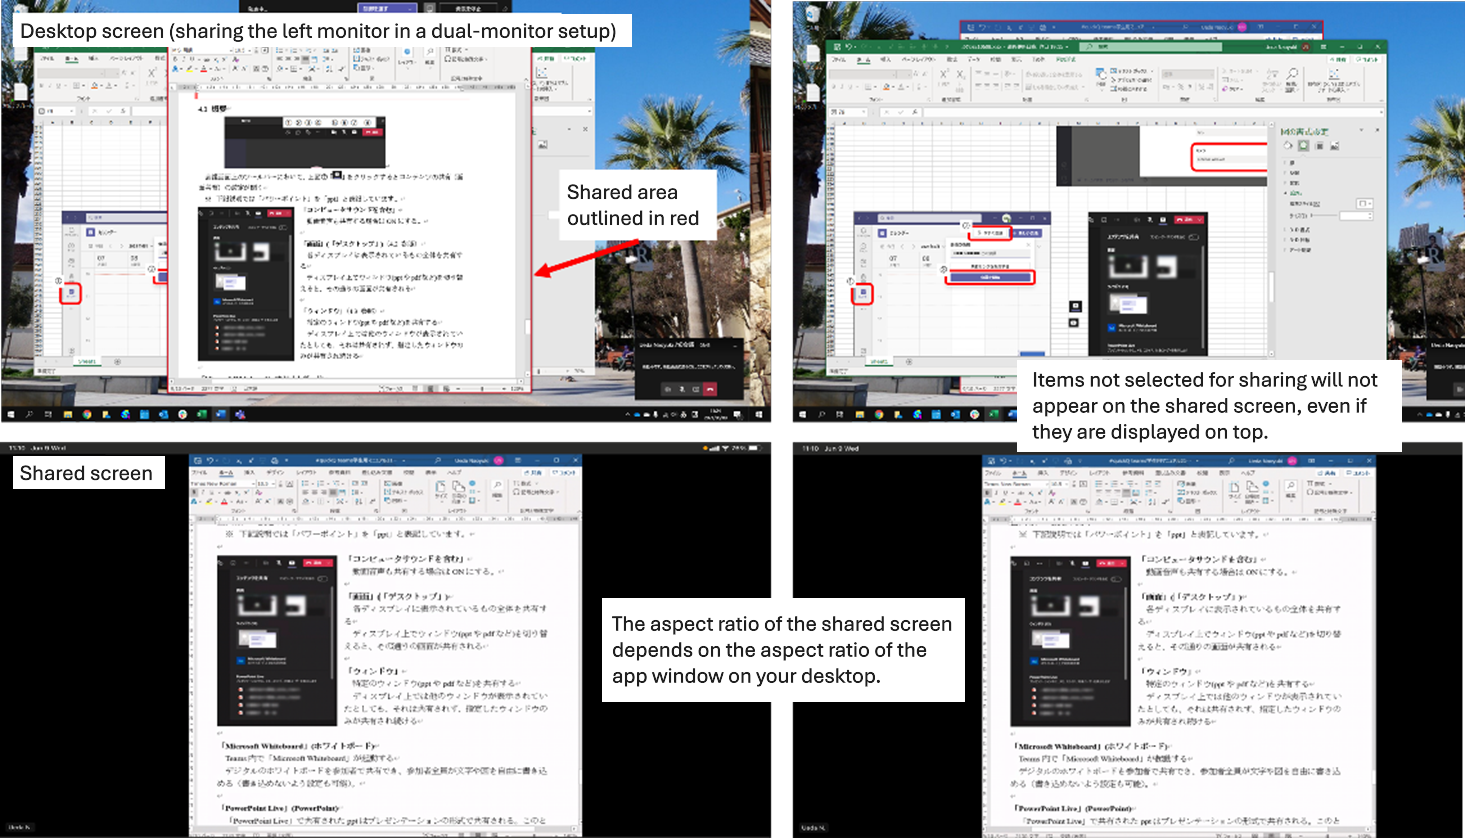
“Screen” (Desktop) (See 2.)
Shares everything displayed on each monitor.
When you switch windows (such as PowerPoint or PDF) on your display, the change will be reflected in the participants’ view.
“Window” (See 3.)
Shares only a specific window (such as PowerPoint or a PDF).
Even if you show another window on your screen, it will not be shared; only the selected window will remain visible to participants.
“Microsoft Whiteboard” (Whiteboard)
Launches “Microsoft Whiteboard” within Teams.
Participants can share a digital whiteboard where everyone can freely write text or draw diagrams (or you can restrict writing if needed).
“PowerPoint Live” (PowerPoint)
PowerPoint files shared via “PowerPoint Live” appear in presentation mode.
Participants can move freely to different slides independently of the presenter’s progress (this can also be restricted if necessary).
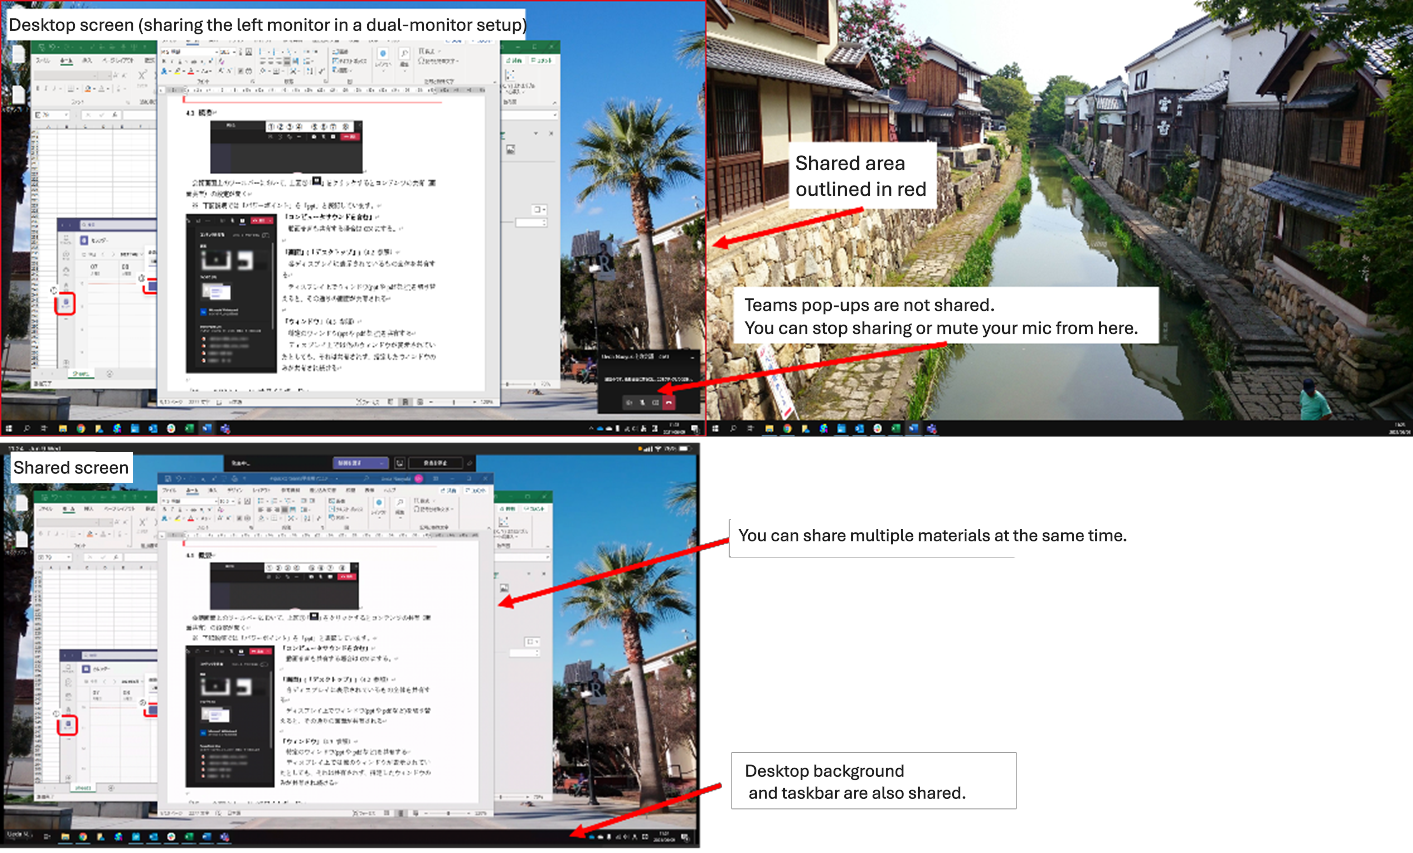
Sharing “Screen” (Desktop)
In this method, Your entire computer screen is shared. If you use multiple monitors, you can choose which display to share.
Because everything on your desktop is visible, you can, for example, show an Excel sheet during a PowerPoint presentation.
However, this also means that participants may see files saved on your desktop, open applications on the taskbar, or popup notifications.
Sharing a “Window”
Only the application you select will be shared. Even if you open another application during sharing, it will not be displayed to participants.
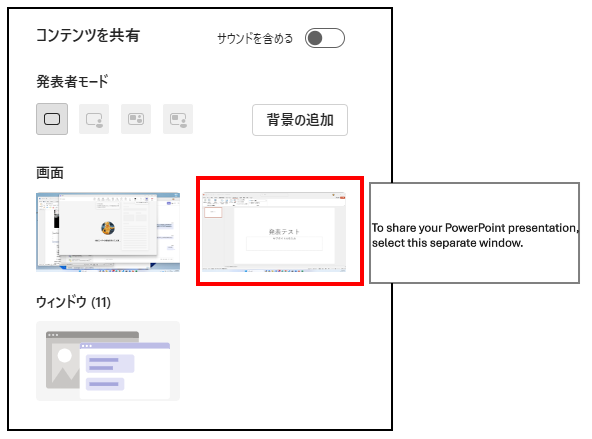
How to Share Your Presentation Screen in PowerPoint
① Switch PowerPoint to presentation mode.
② Go back to Teams and select that window.
*Note that the presentation screen opens as a separate window.
Mute Other Participants
Note: A muted microphone can be unmuted by the user themselves. Also, you cannot turn off other participants’ cameras or disable the meeting chat.
A. To mute all other participants
*This is available only to the presenter.
Open the participant list from the Teams meeting toolbar.
Click “Mute all” at the upper right of the participant list.
B. To mute individual participants
In the participant list, hover over the user you want to mute, click “⋯”, and then select “Mute participant”.
Record a Meeting
Start Recording
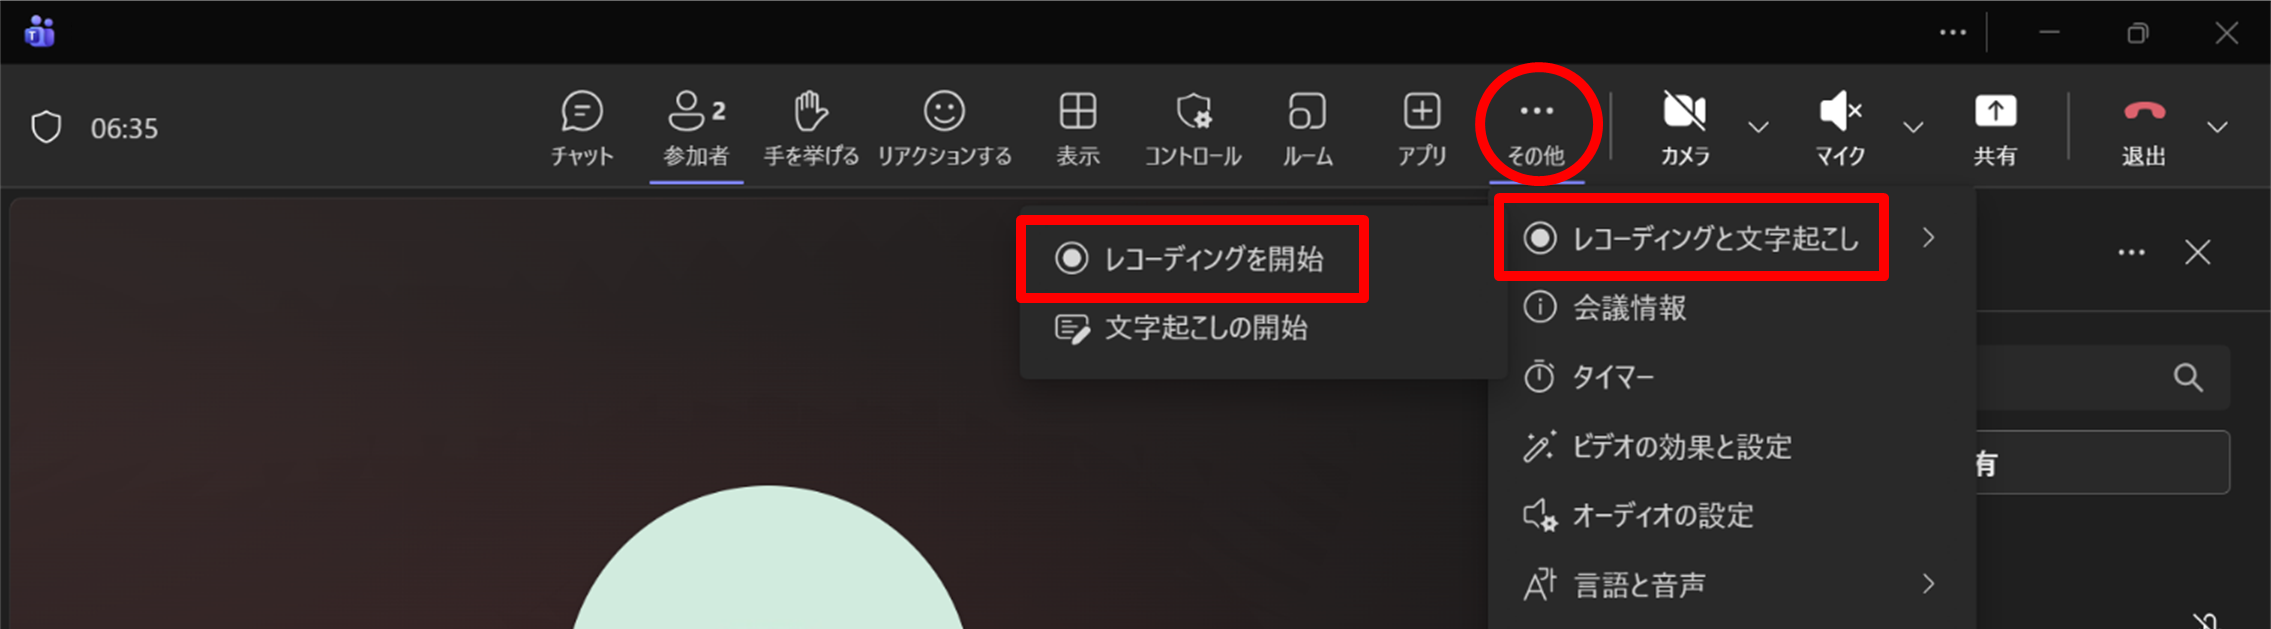
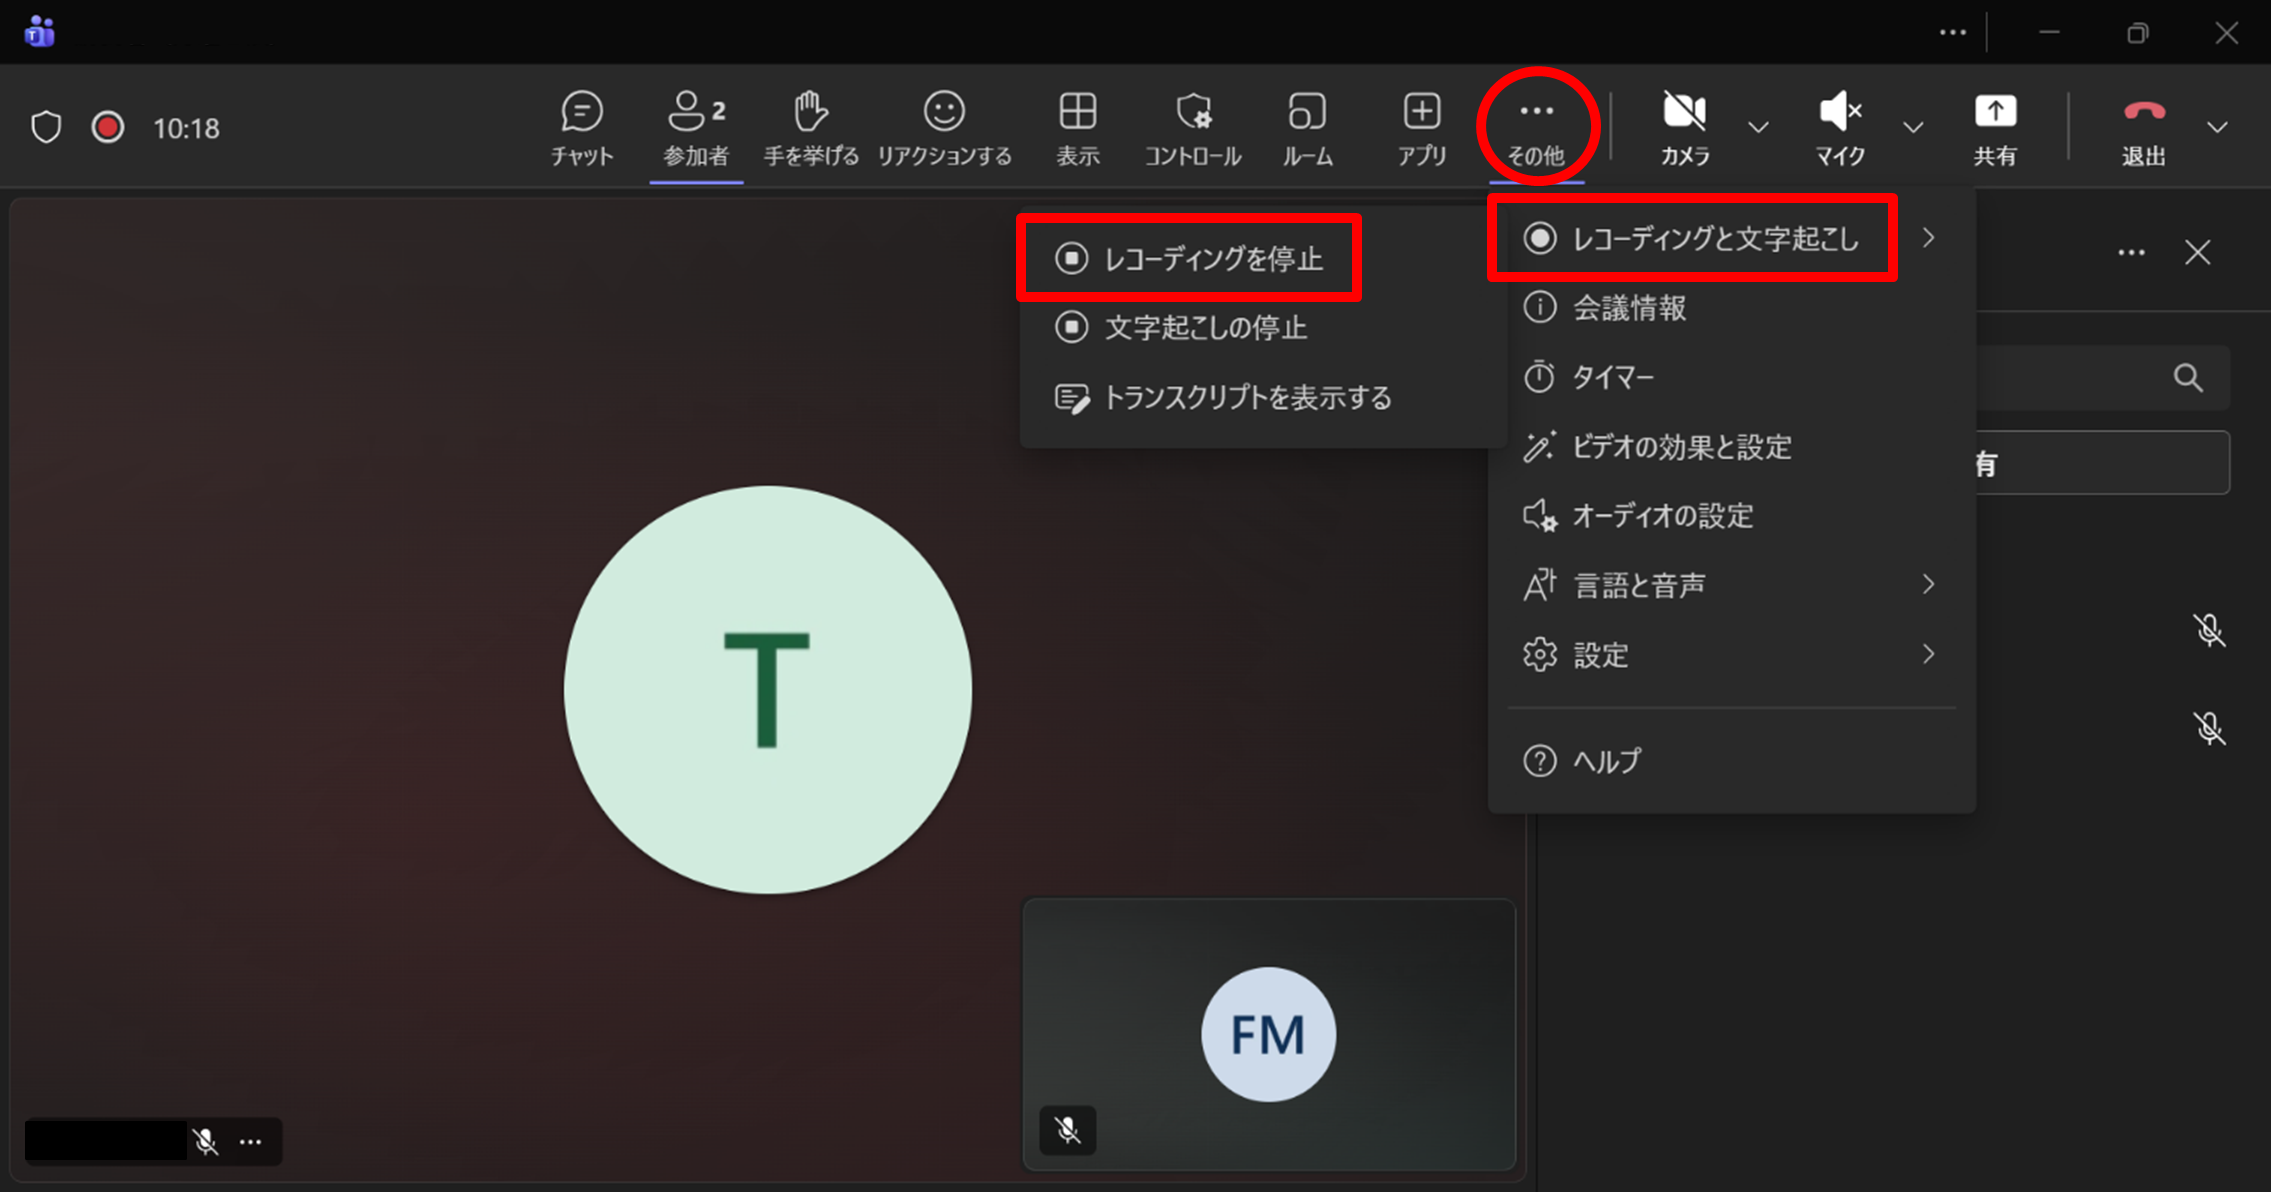
① From the Teams meeting toolbar, open “More actions (⋯)” → “Record and transcribe” → “Start recording”.
② When the options window appears, click “Confirm” if everything is correct. Note: By default, both video and audio are recorded. If you want to record audio only, select “More options” → “Audio only”.
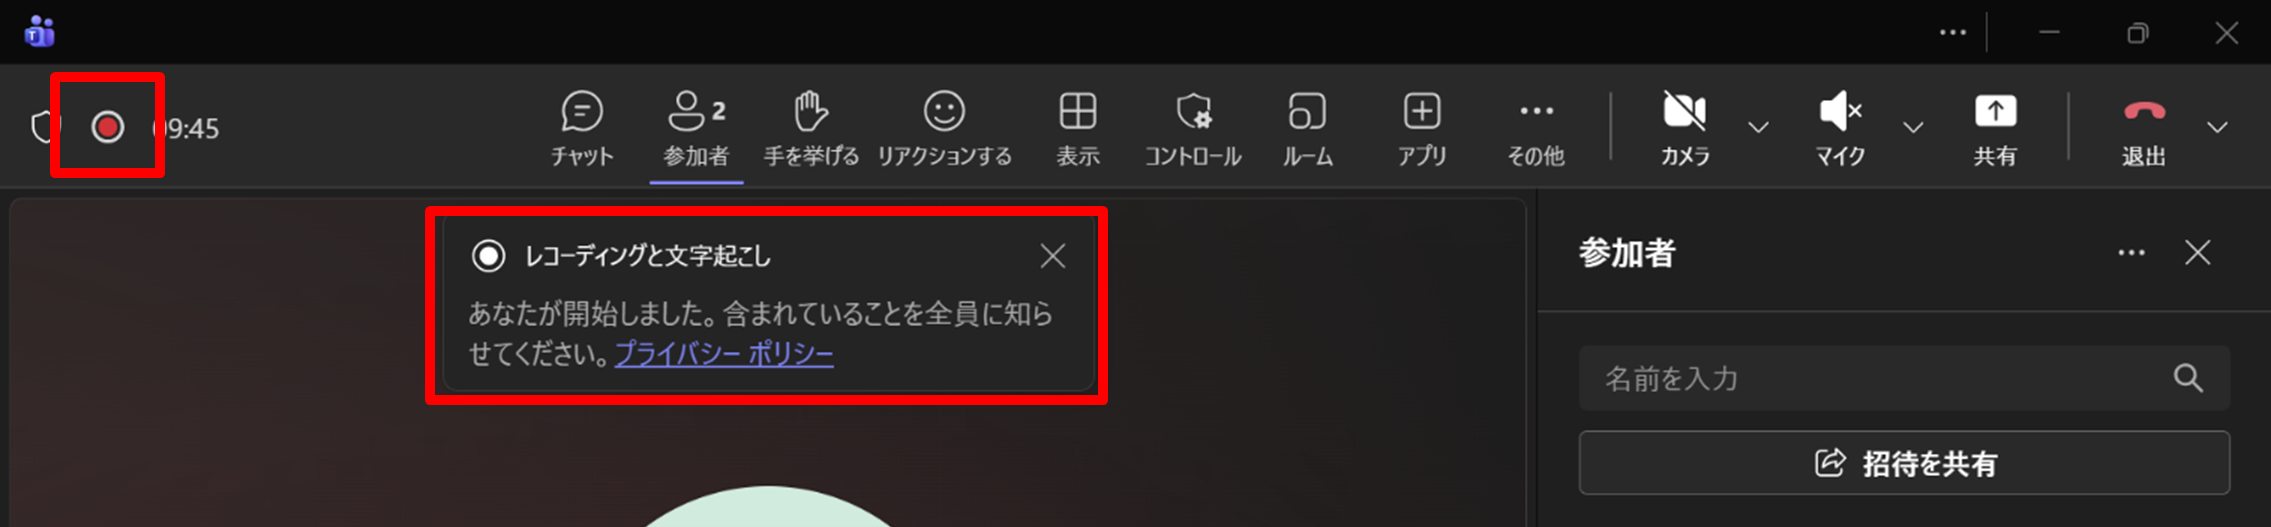
③ When recording starts, all participants will be notified.
While recording is in progress, a recording icon appears on the left side of the toolbar.
Stop Recording
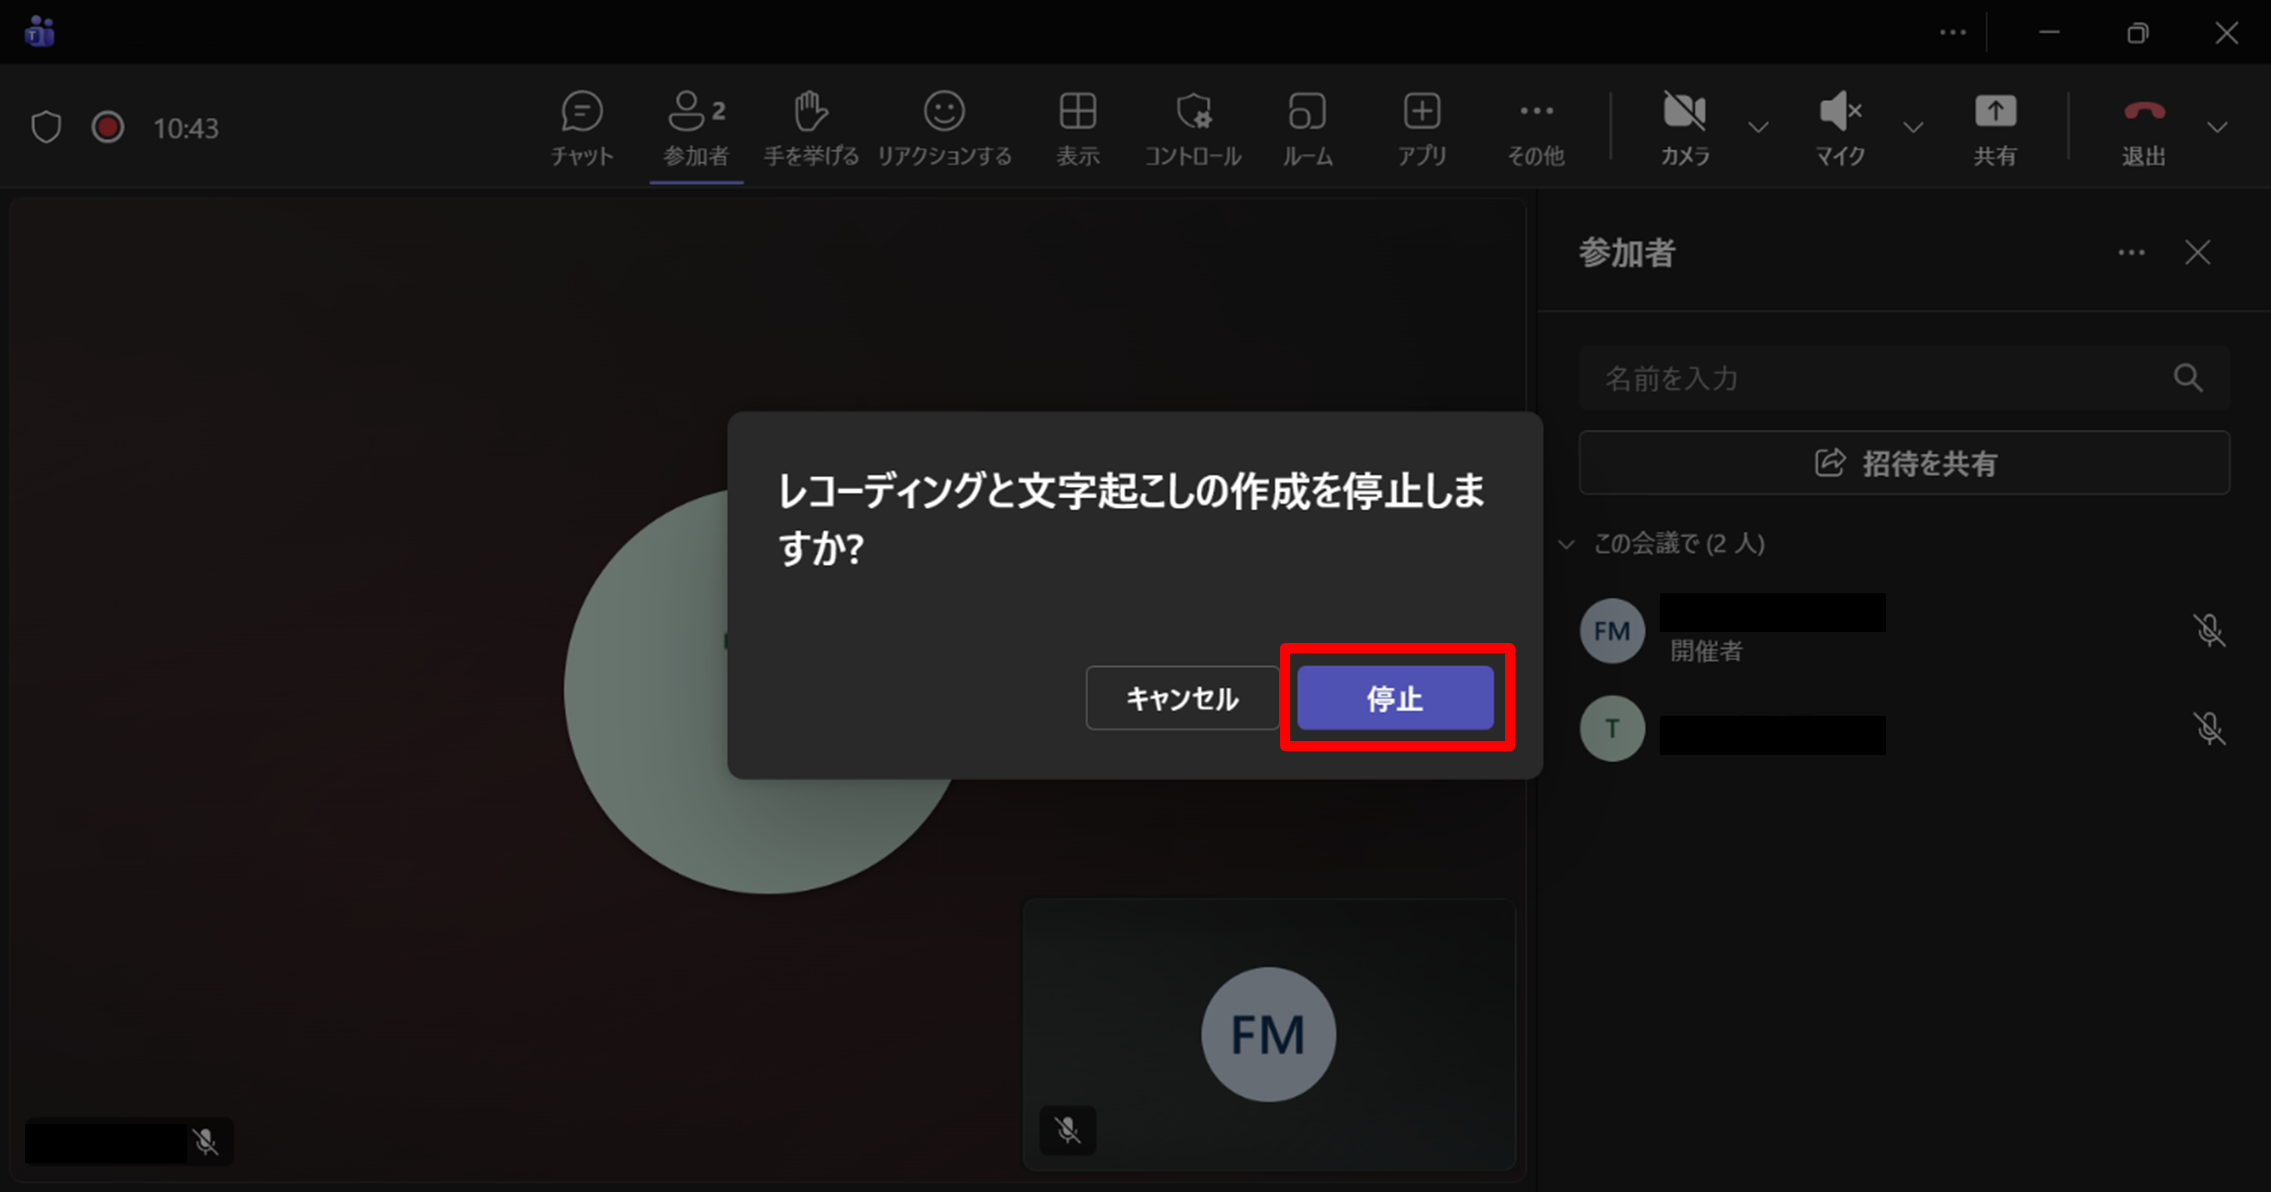
① From the Teams meeting toolbar, open “More actions” → “Record and transcribe” → “Stop recording”.
② In the confirmation window, click “Stop”.
When recording stops, all participants will be notified.
Save the Recording
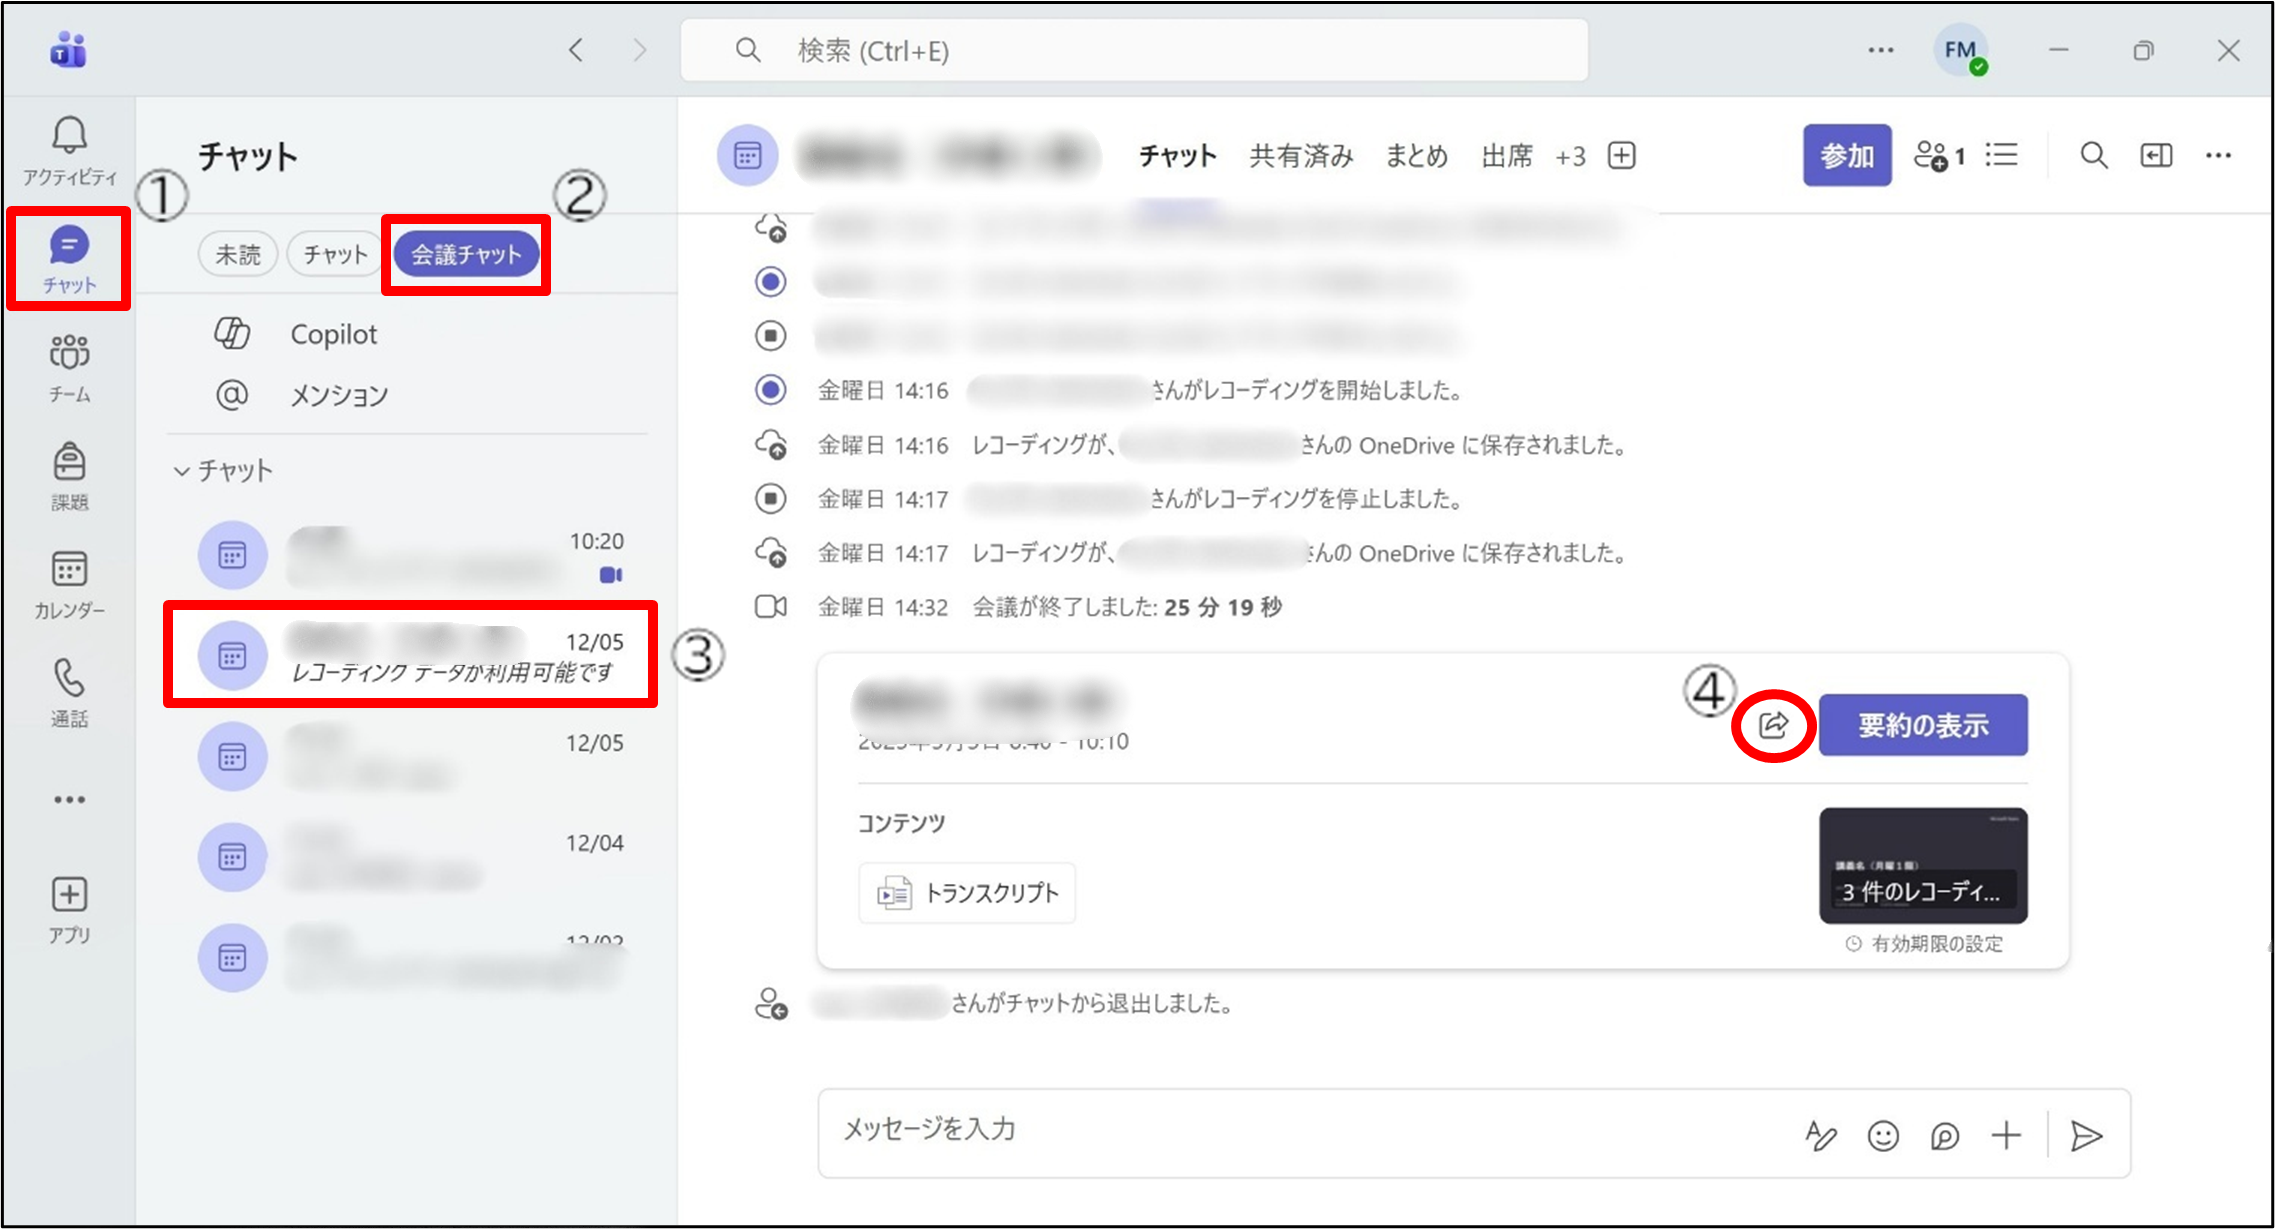
The recorded video and audio files are automatically saved to the OneDrive of the user who started the recording.
Get the Recording Link
After the meeting ends, a link to the recorded video/audio will be automatically posted in the meeting chat in Teams.
Click the icon labeled ④ below and then click “Copy link”.
*Other participants can also download the recording from this message.
*The recorded video can be downloaded from the meeting chat even after the meeting has ended.
Other Settings
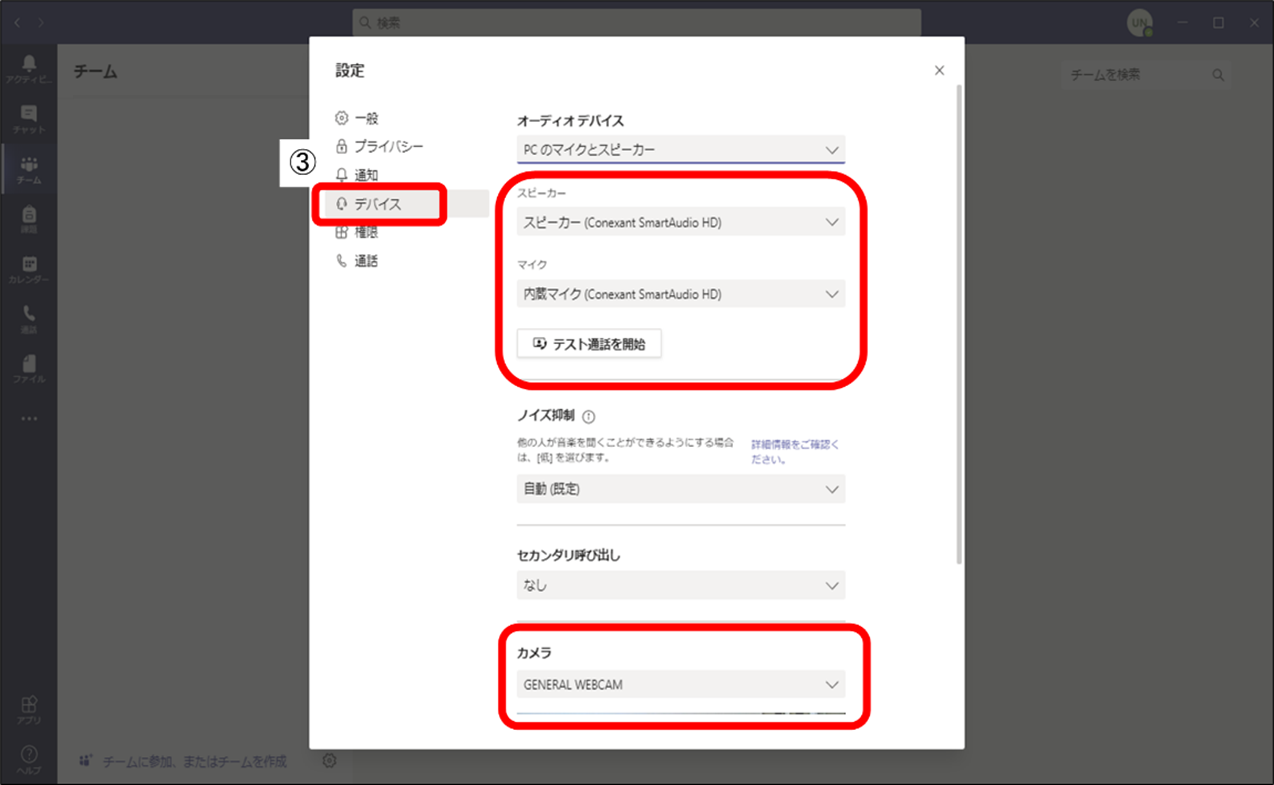
Check Device Settings
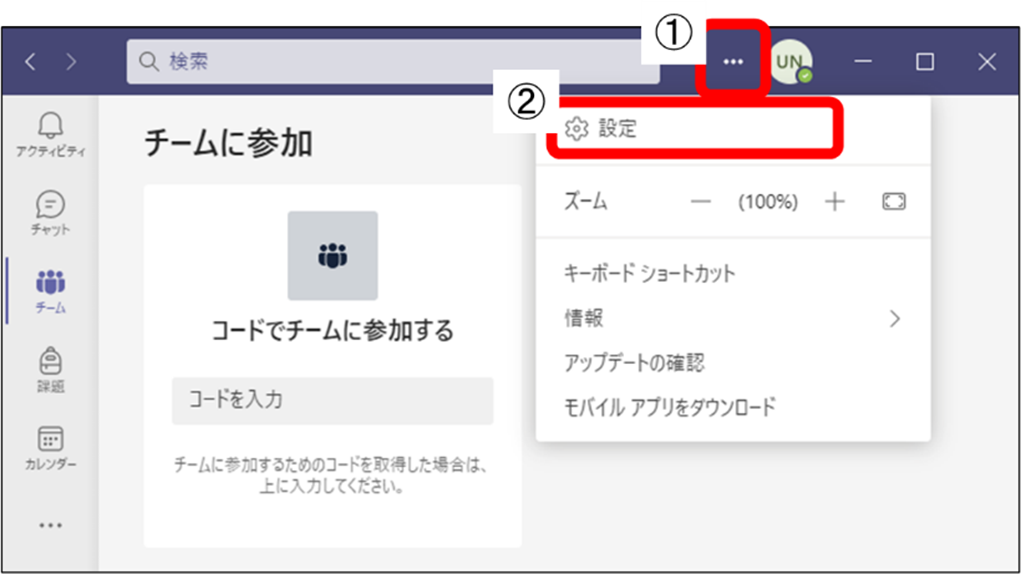
① Click the “⋯” to the left of your profile icon.
② Click “Settings”.
③ From the list of settings, select “Devices”.
④ Make sure that “Speaker”, “Microphone”, and “Camera” are set correctly.
When you select “Make a test call”, you will be connected to “Teams Echo”, where you can follow the automated instructions to confirm your device settings.
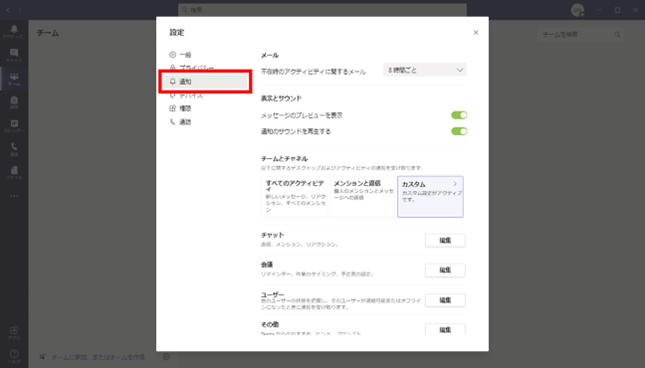
Mute Notification Sounds
If IM notification sounds are distracting, you can mute them in the settings.
① Click the “⋯” to the left of your profile icon.
② Click “Settings”.
③ From the list of settings, select “Notifications and activity”.
Turn off any notifications you want to disable.
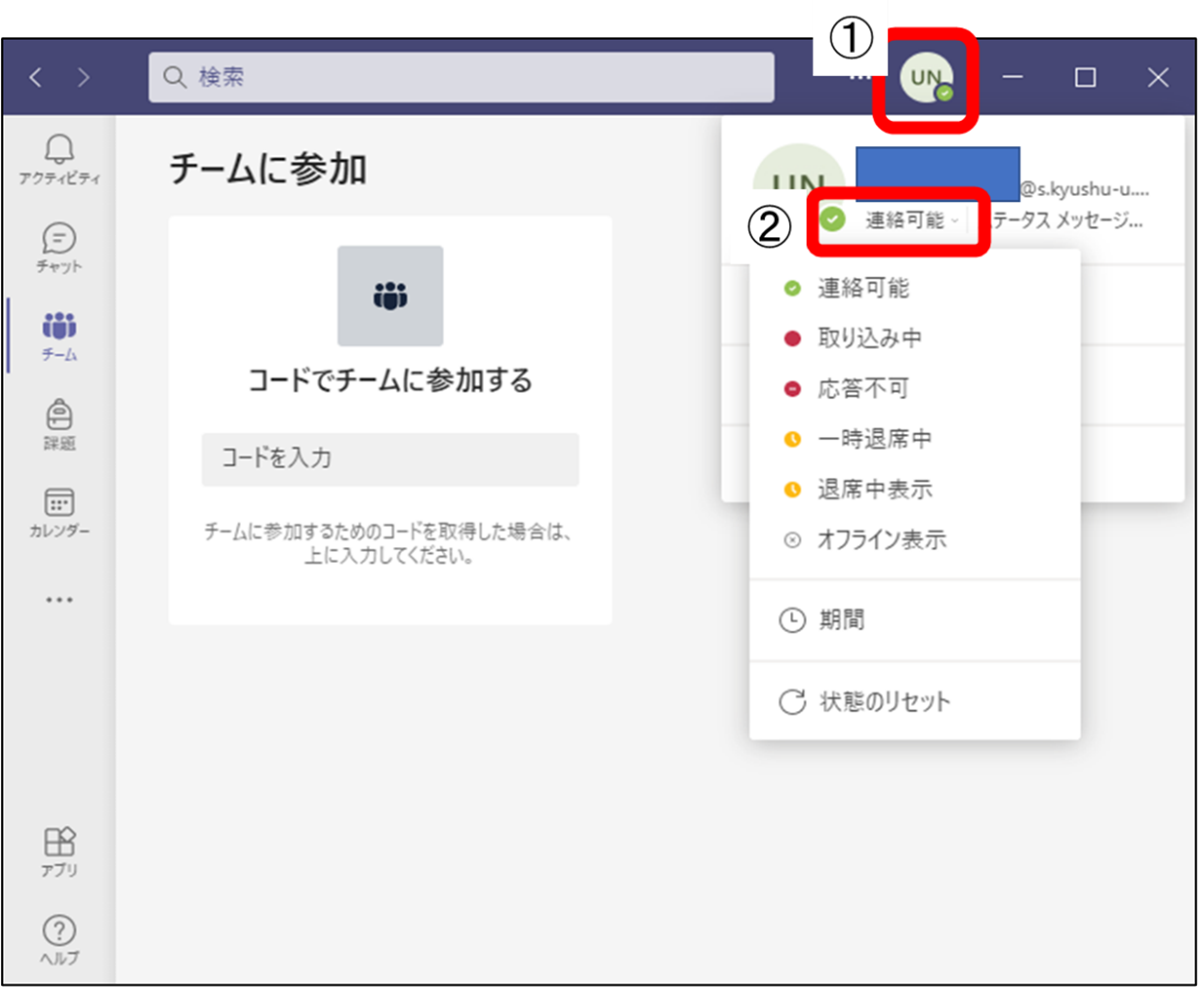
Decline Calls
From the profile icon at the upper right of the home screen, change your status to “Do not disturb”.